We all know the immense power Instagram Reels hold.
These short videos are more than just a creative outlet; they’re a pivotal tool for businesses of all sizes to connect with their audience in fresh and compelling ways.
Consider this intriguing statistic:
Reels are not just a favorite pastime but a legitimate powerhouse for user engagement. On average, Instagram Reels boast a rich engagement rate of 1.23%.
Pretty impressive, right?
Here’s another one:
61% of Gen Z TikTok users are planning to shift more of their time to Instagram Reels. This shift represents a significant opportunity for businesses to tap into a vast and active audience.
But how can your business effectively leverage this potential?
If you’re unsure where to start, don’t worry. You’ve come to the right place. This comprehensive guide is designed to help you master Instagram Reels and unlock their full potential for your brand. From understanding the basics to implementing advanced strategies, we’ve got you covered.
Let’s get rolling and unravel the magic of Instagram Reels together.
What Are Instagram Reels?
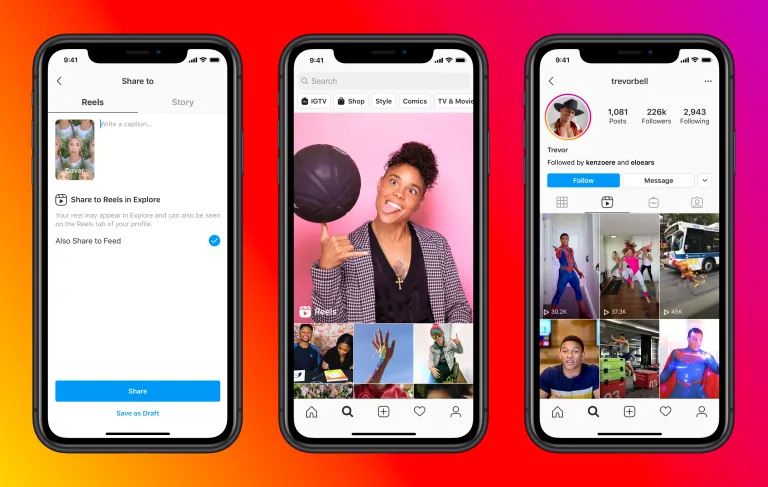
Instagram Reels, launched in 2020, is Instagram’s innovative response to the surging popularity of TikTok. This feature has rapidly become a favorite among content creators, influencers, and businesses. Reels offer a dynamic way to create and share short, engaging videos on Instagram.
These vertical videos can range from 15 to 90 seconds when recorded directly in the app, and up to 15 minutes when uploaded from your device.
Reels stand out with their rich editing tools, allowing for multi-clip splicing, a variety of filters, captions, dynamic backgrounds, stickers, and more. Plus, you can either add your own audio or choose from Instagram’s extensive music library to give your videos that extra flair.
How Does the Instagram Reels Algorithm Work?
Instagram Reels have transformed the social media landscape by providing a fun, engaging avenue for creators and businesses alike. However, mastering the art of Instagram Reels isn’t just about creating compelling content; it’s about understanding and outsmarting the Instagram Reels algorithm.
So, what’s the significance of the Instagram Reels algorithm?
This algorithm acts as the unseen force that determines the fate of your Reels. It’s responsible for deciding which Reels capture the spotlight and which ones fade into obscurity. When you upload a new Reel, it categorizes your content and evaluates its relevancy for the people who aren’t following you yet. This process is crucial as it helps propel your Reels to new audiences, significantly broadening your reach beyond your current follower base.
That’s not all.
The algorithm also gives you a spotlight on the Reels tab and the Explore tab. Landing your content in these spots can lead to a significant boost in audience engagement. Hence, understanding this algorithm is pivotal to making Reels a successful part of your Instagram marketing strategy.
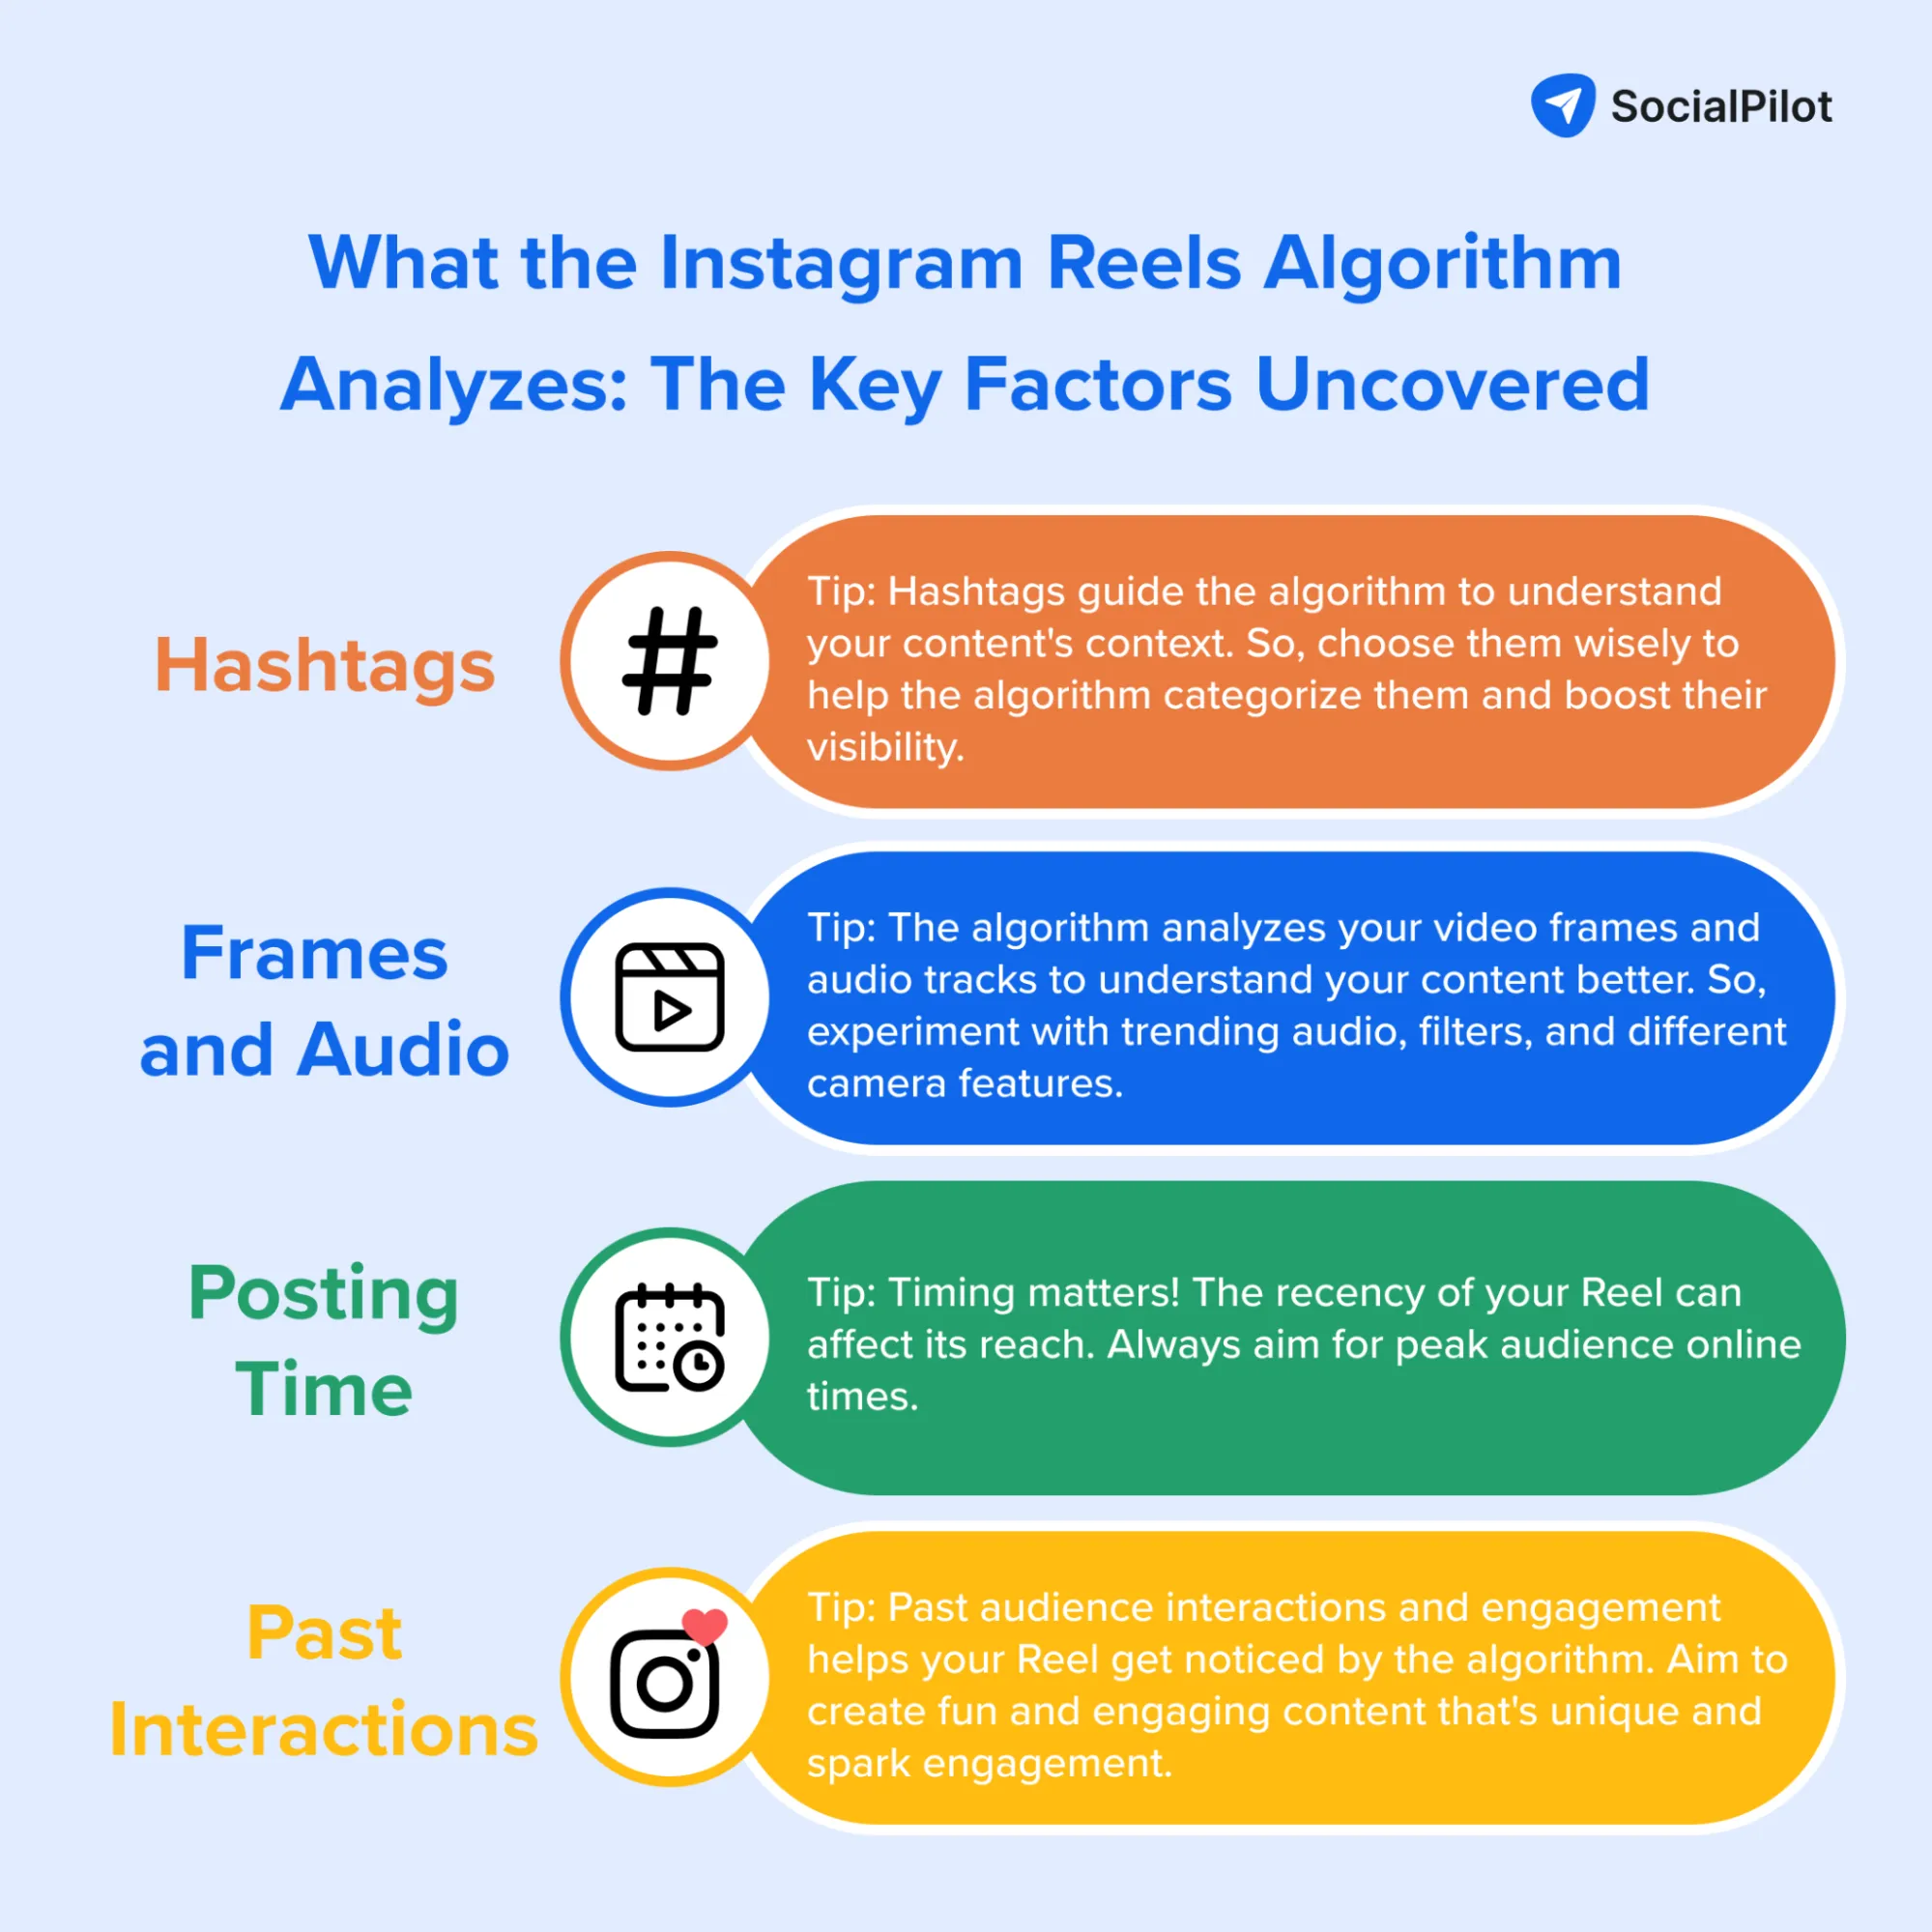
Now that you better understand the Instagram Reels algorithm and how it scrutinizes your content, it’s time to put the knowledge into action and create your Reel.
How to Make Reels on Instagram?
Let’s get to the fun part – making your first Instagram Reel.
But remember – before you start making Reels, have a clear marketing strategy. Keep the algorithm study discussed above in mind while creating a Reel.
Here is a 4-step guide to making your Instagram Reels.
Step 1: Open Instagram Reels Editor
To start, access the Instagram Reels editor. You can do this by tapping on the “+” sign from your main feed or swiping right. The action will take you to your camera roll, where you can scroll to “Reel” at the bottom of the screen and tap it.
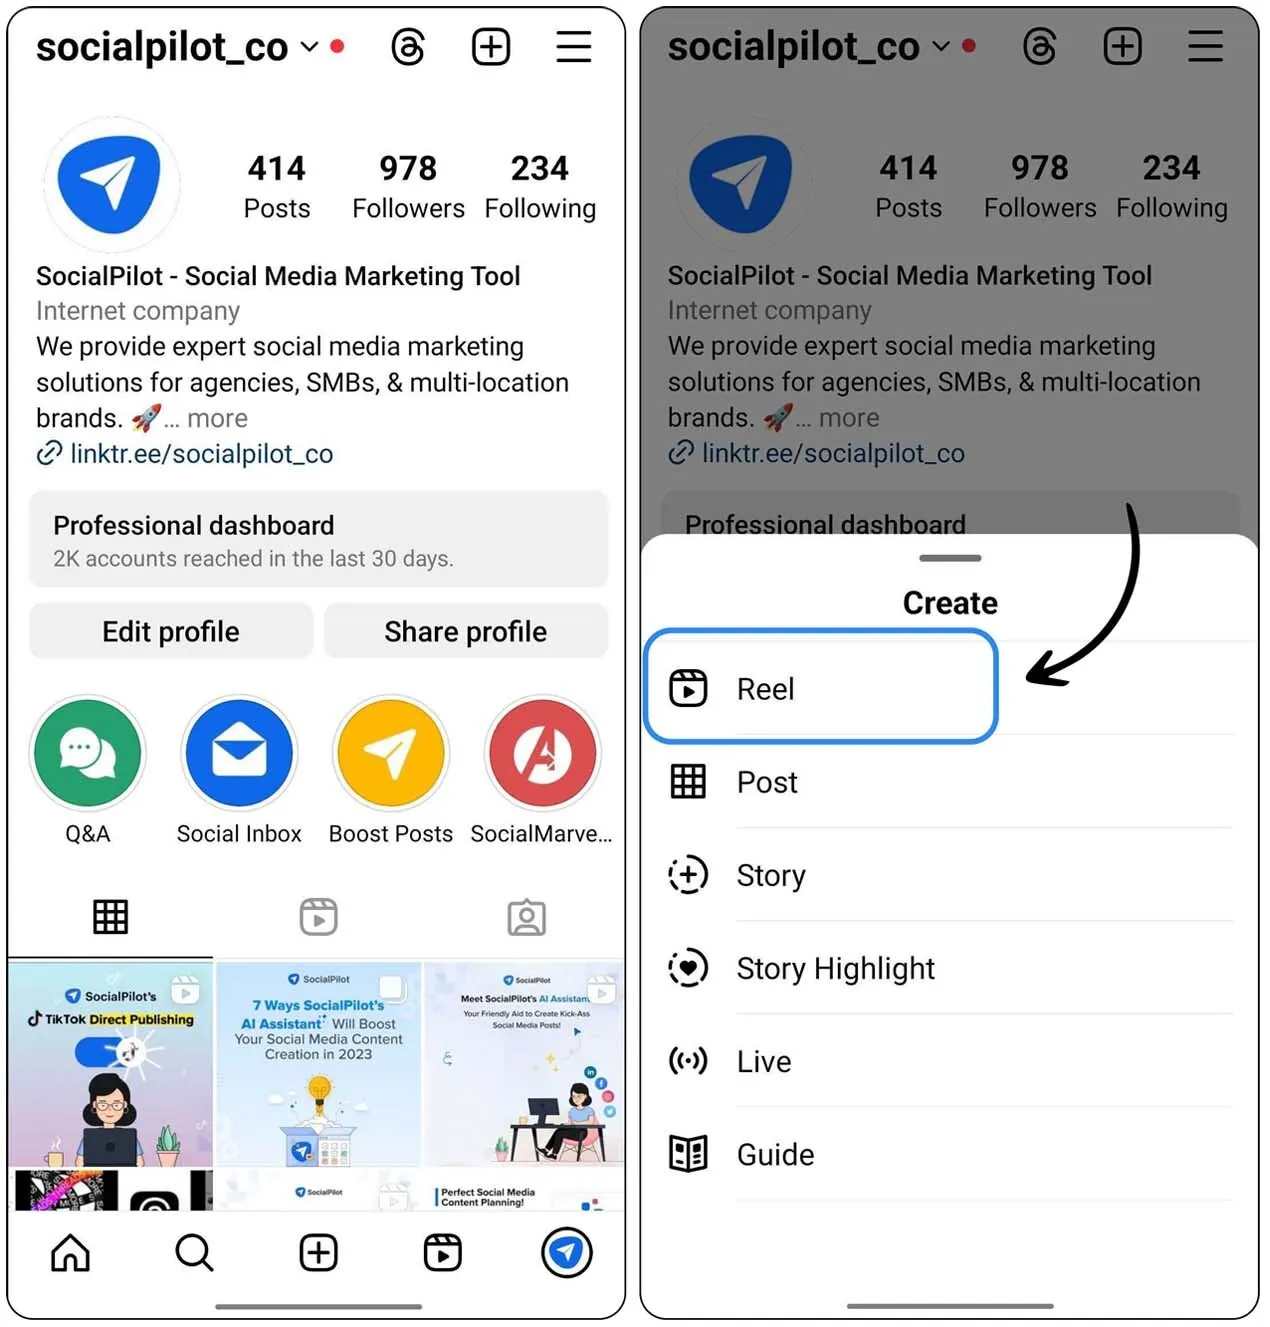
At this stage, you can also add audio, effects, time duration, and more to prepare for your recording. These features remain accessible even after recording or uploading your video.
Step 2: Record or Upload and Edit Your Video Clip
Instagram offers two ways to create a Reel: either directly record by pressing and holding the record button or uploading a video from your camera roll. After that, you can trim and stitch multiple videos together and make a single Reel.
Uploading a Reel from your device’s storage is straightforward. Just tap the “+” symbol located at the bottom left corner, or simply swipe up.
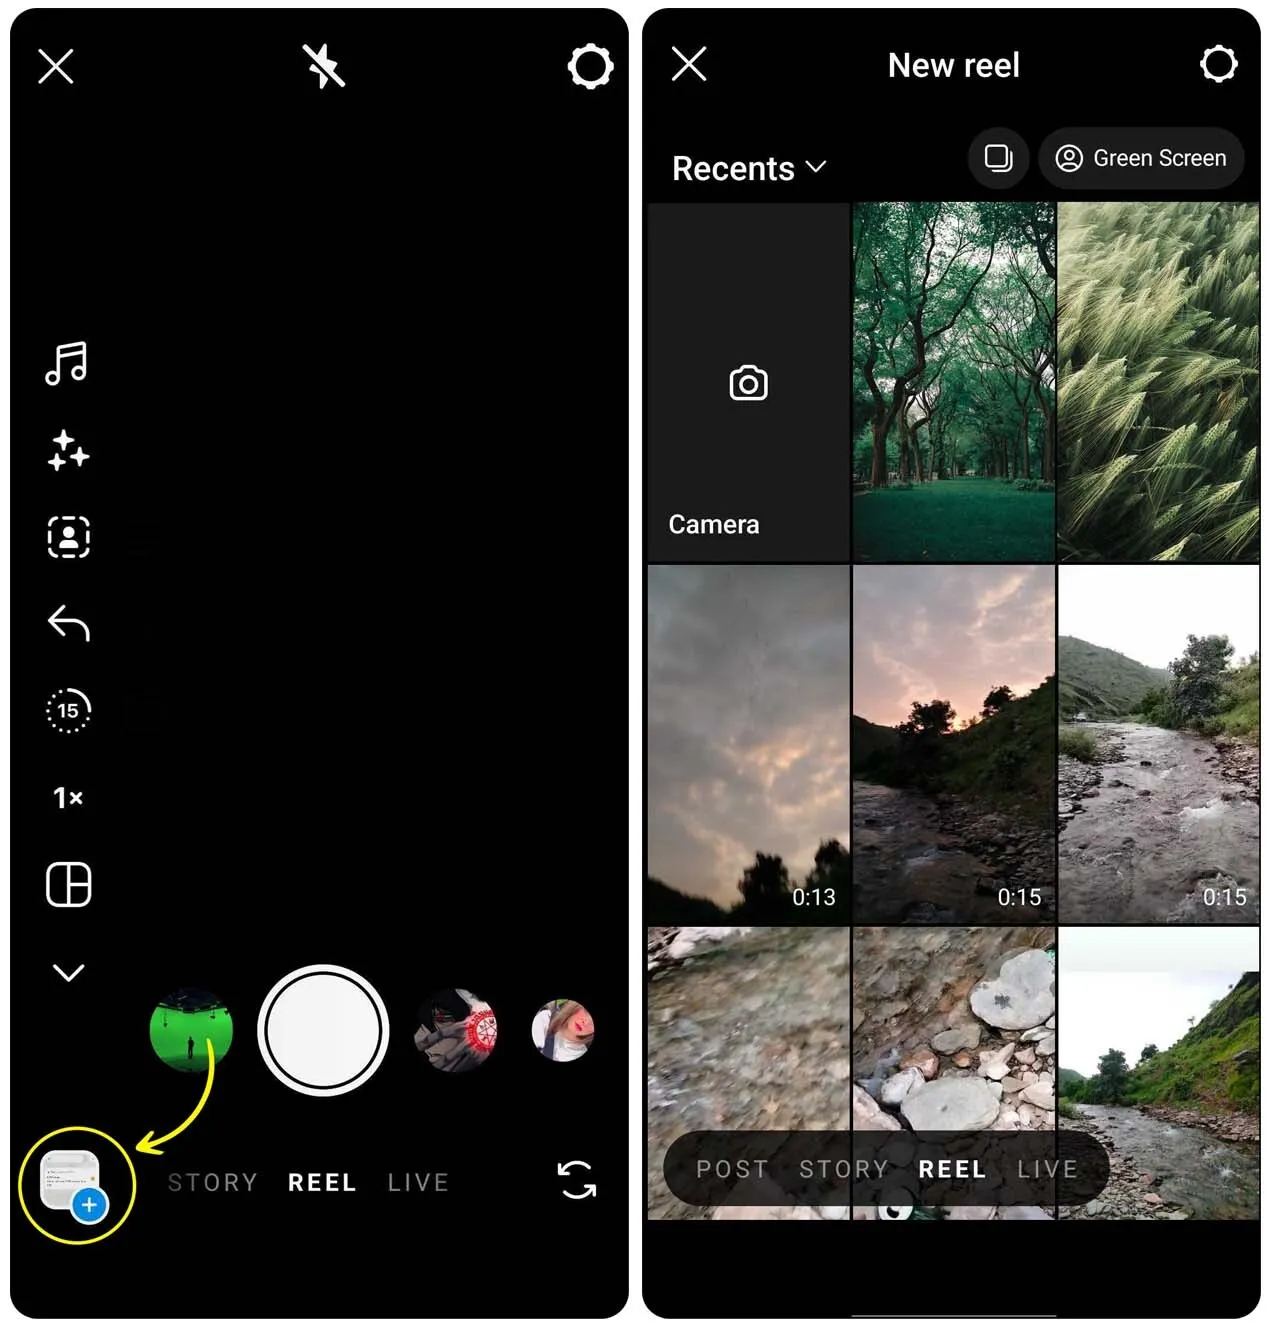
On the other hand, there are also multiple ways to record the clip:
- Press and keep holding the record button while you’re filming the Reel
- Click the record button to start recording, and then click it once more to stop
- Use the timer feature by clicking the button on the left side, and set the duration of your video. After setting the timer, you’ll see a countdown of at least three seconds before the recording starts.
While recording, simply tap the record button to conclude a clip, and then give it another tap when you’re ready to kick off a new clip.
At this stage, you can use some of the following features Instagram gives you to make the task of recording more dynamic and easier:
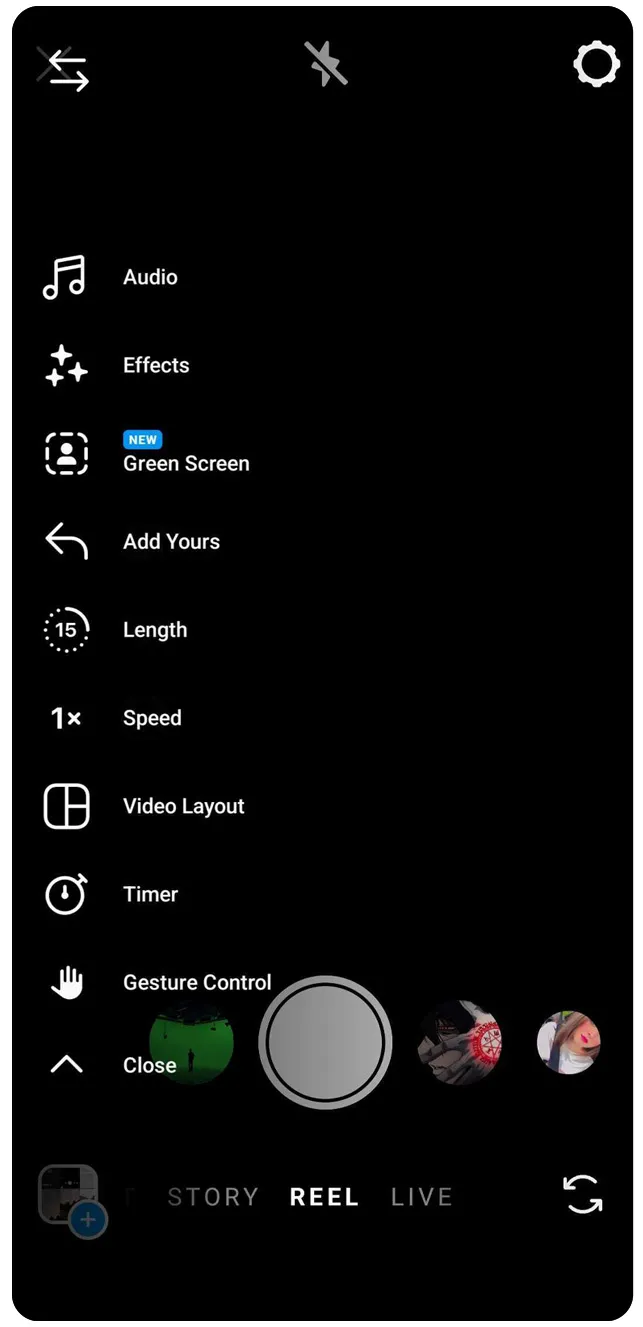
- Audio: This feature allows you to personalize your Reel with music. Choose a track from Instagram’s extensive music library or upload a custom audio file from your device. You can also select a specific song segment that best suits your video.
- Effects: You get many filters and special effects to enhance and personalize your Reels. From quirky filters to dynamic visual effects, choose the perfect one that aligns with your content and style.
- Length: With this function, you can adjust the duration of your Reel as per your preference. Select 15, 30, 60, or 90-second video options to fit your content perfectly.
- Speed: This option lets you control the playback speed of your Reel. Choose from slower (.3x or .5x) or faster speeds (2x or 3x) to create dynamic effects and keep your audience engaged.
- Layout: This feature allows you to manipulate the layout of your video. Add multiple recordings to a single frame to create an engaging collage or sequence. Here, you can also utilize your device’s front and rear cameras simultaneously. This can help create engaging, multi-angle Reels.
- Timer and Gesture Control: Set a timer or use gesture control to initiate recording, freeing up your hands for the actual content creation.
After recording, preview your Reel by clicking ‘Next.’
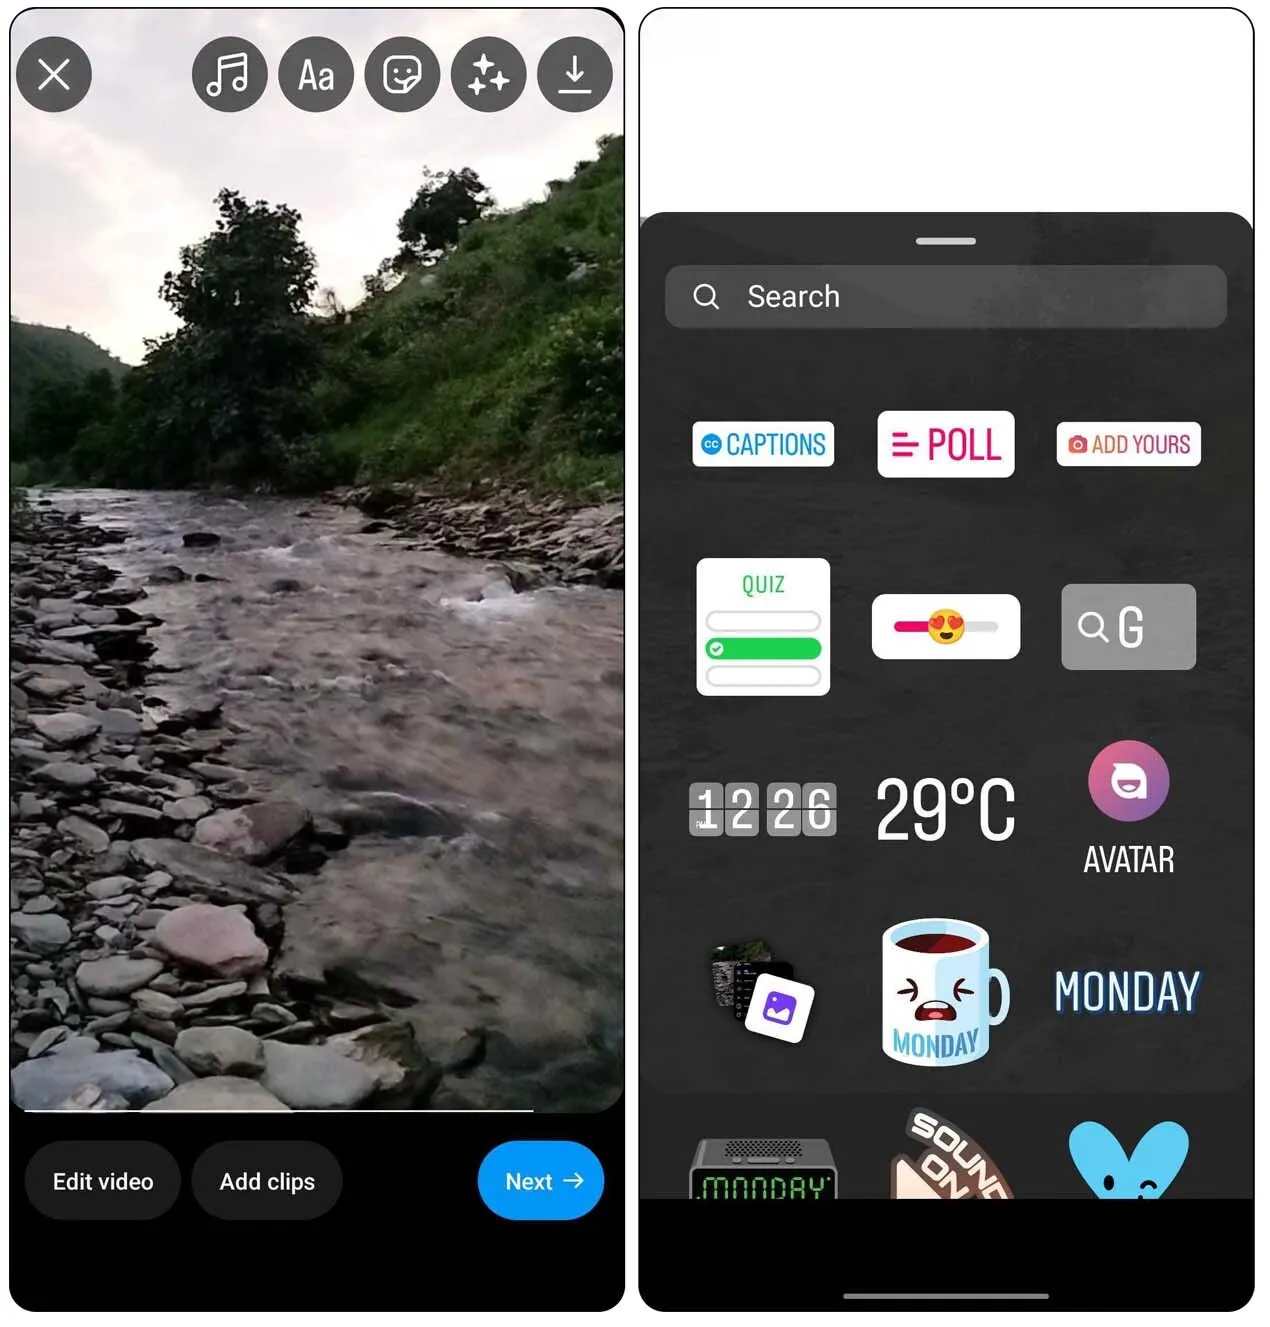
Step 3: Check the Final Preview and Customize
In the preview section, you can further edit your clip, add more content, trim, add audio, effects, texts, stickers, and even download your creation. Once satisfied, proceed to the next editing phase.
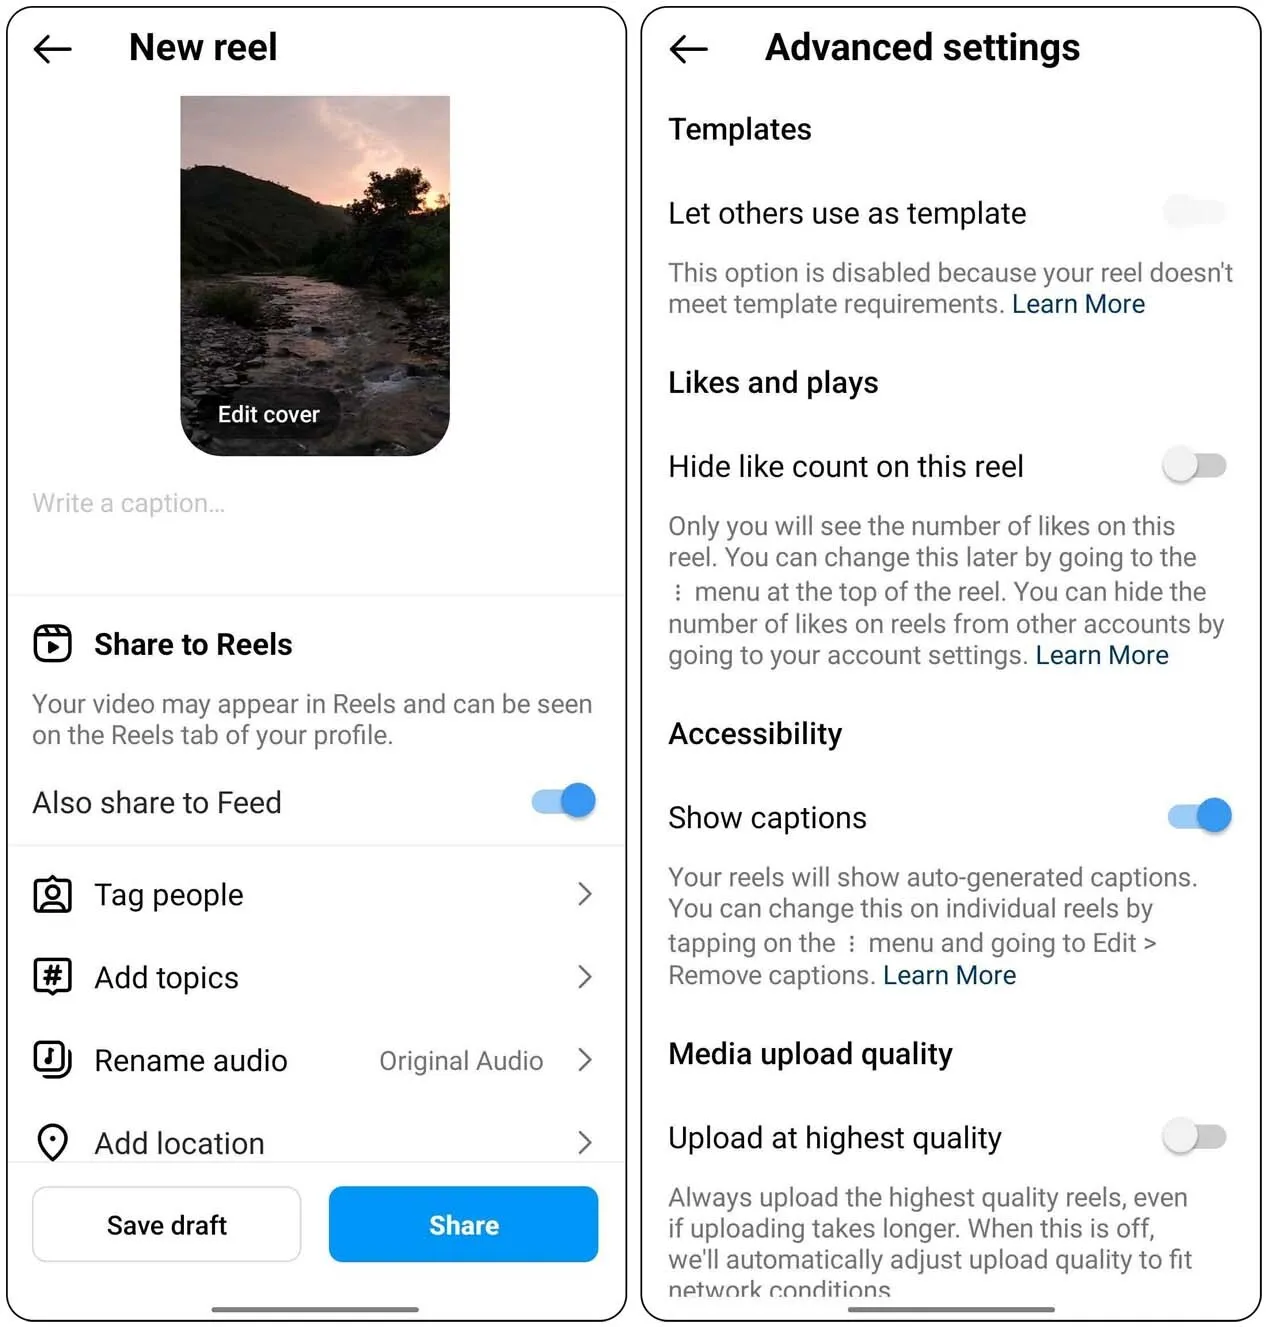
Step 4: Adding Captions and Advanced Settings
After clicking “Next,” you’ll reach a screen similar to the standard posting interface. Here, you can add a captivating caption, hashtags, and set a cover image for your Reel. Utilize advanced options like tagging people, adding topics, renaming audio, adding a location, and enabling auto-generated captions.
With all that done, you can now share your Reel with the world!
How to Schedule Your Reels on Instagram?
Let’s face it…
Manually posting Instagram Reels works like a charm when it’s just you and your personal account. But, when juggling the social media profiles of a bustling business or as a multi-account handling agency, it can feel like you’re caught in an endless loop of switching desktop tabs.
But is there a way to take the stress out of posting?
Easy peasy, just weave an Instagram Reels scheduling into your workflow. This cool hack lets you pre-plan your Instagram Reels, queue them up, and sit back and chill. Your future self will thank you for doing the hard yards up front.
And guess what?
The scheduling tool does the heavy lifting, ensuring your content gets out right on time while you brainstorm your next viral Reel. There are three methods to schedule your Instagram Reels:
- Native Instagram Scheduler
- Meta Business Suite
- Social Media Management tool like SocialPilot
Which method is the best of all?
Well, here, SocialPilot takes the crown because it not only lets you enable the scheduling of Instagram Reels but also facilitates the management of posts across various social networks, all from one super-sleek unified dashboard.
Check out the step-by-step guide to schedule your Instagram Reels with SocialPilot.
Can You Boost Reels on Instagram?
Boosting Reels on Instagram is a strategic move to expand your reach and connect with new audiences.
While organic posting plays a crucial role in maintaining a consistent presence, occasionally boosting Reels can significantly enhance visibility among potential customers. Instagram video ads are an effective way to gain more exposure.
Your boosted Reels will appear in the feed, Stories, the Reels tab, and the explore page to help new customers find your brand.
Let’s take a look at how you can boost your Instagram Reels:
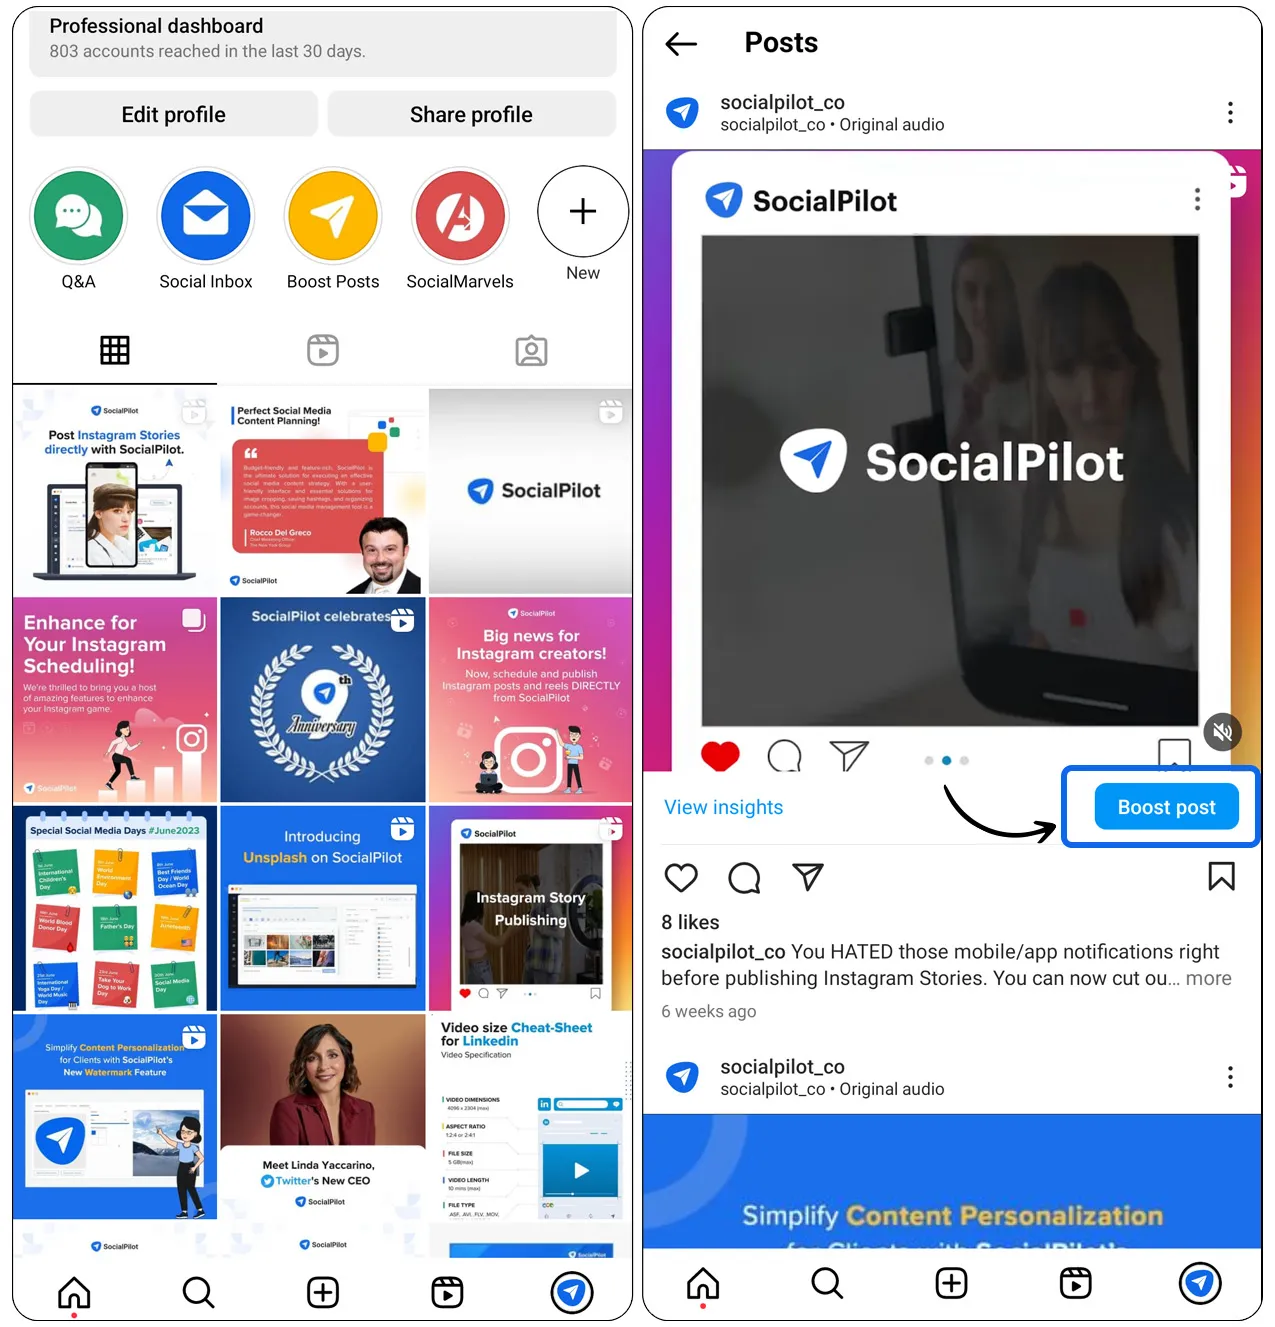
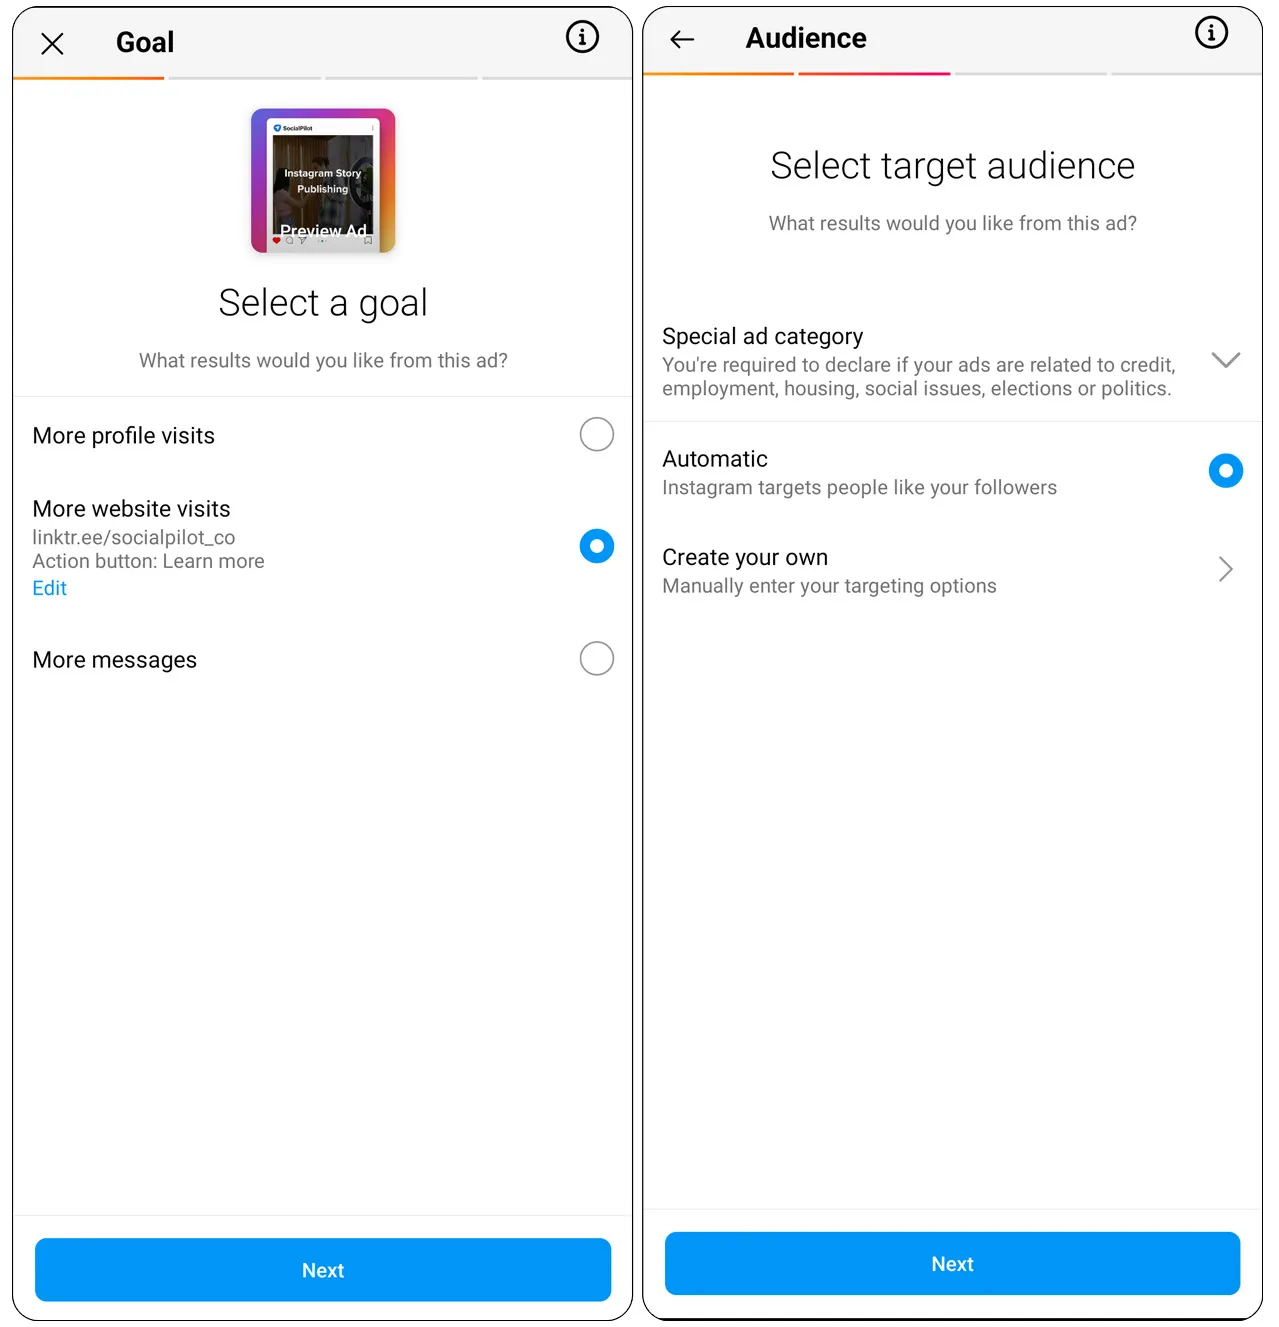
Step 1: Go to your Instagram profile and open the Reel you want to Boost as an ad. At the bottom right corner, you will find a shiny blue CTA calling you to ‘Boost Post.’ Tap on it.
Step 2: Next, you will have to set a goal to define what results you want from this ad.
Step 3: Select your target audience manually or let Instagram automatically decide it for you. In this window, you must also declare whether your ad is related to a certain category from a list of options.
Step 4: Finally, select how much you will spend on the ad daily and decide the timeframe for how long you want your ad to run. Once these parameters are set, you can review them and ‘Boost Post.’
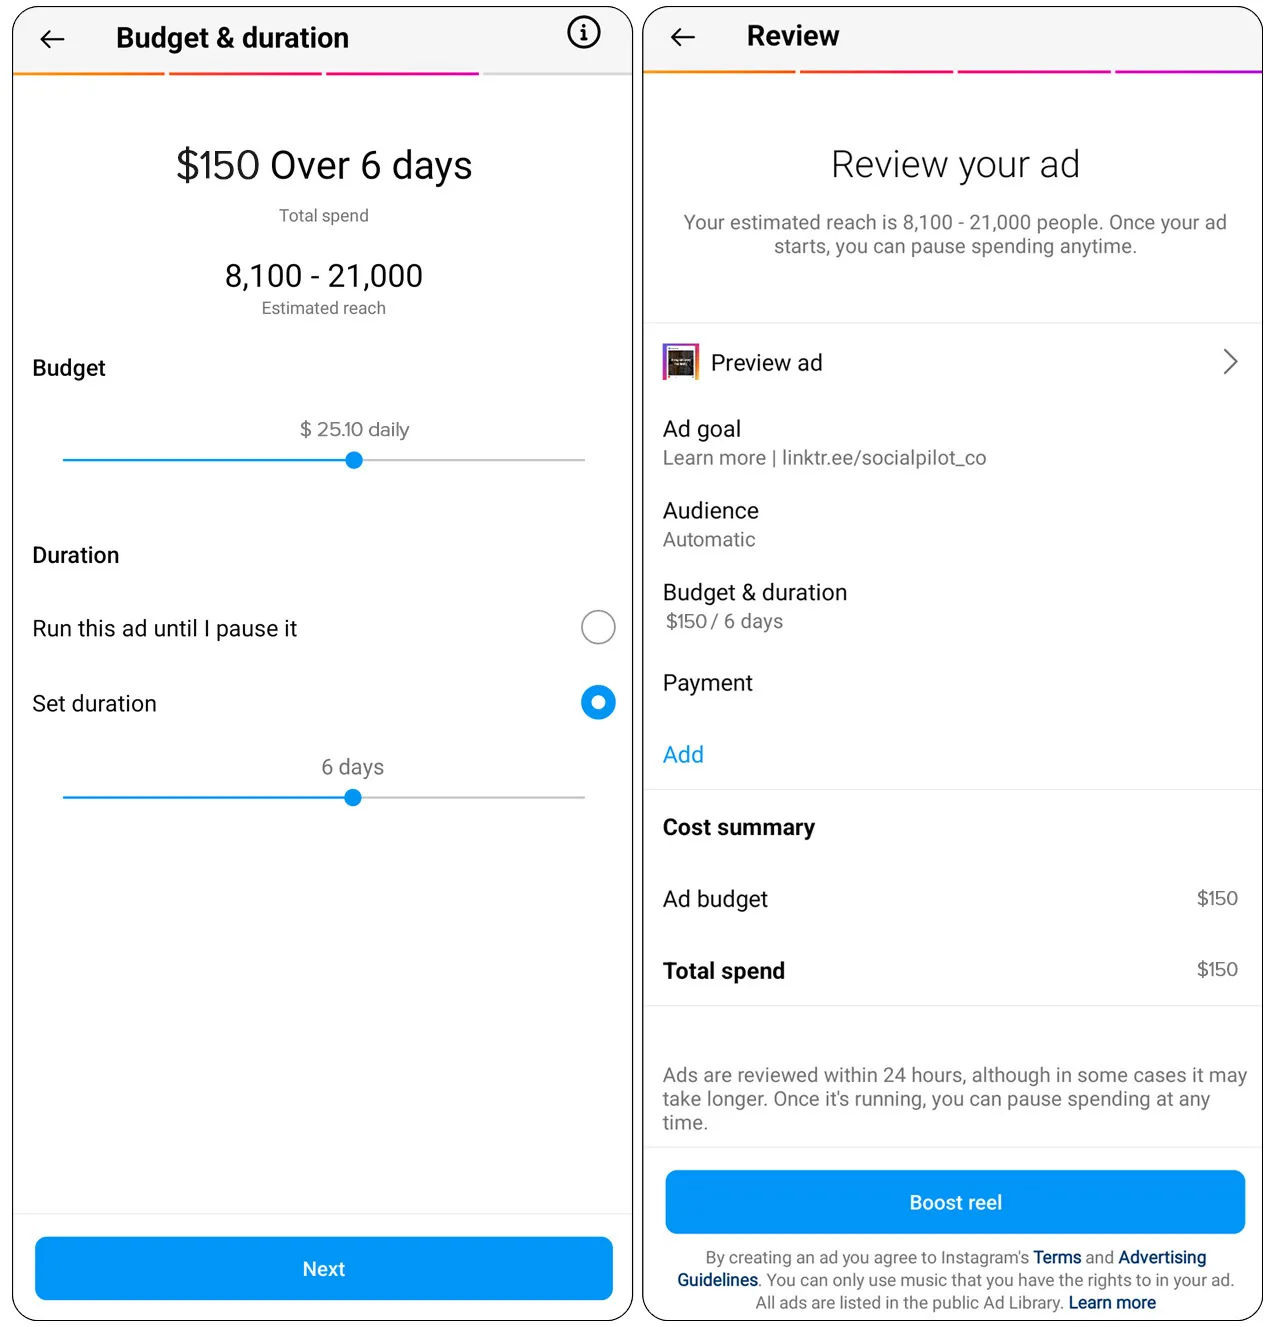
Keep in mind…
Your ad will not go live the moment you hit the boost post button. First, good people at Instagram will review it to ensure the Reel meets their ad policies. Your ad will begin running after it’s been reviewed and approved.
Can You See Who Views Your Reels on Instagram?
Unfortunately, Instagram doesn’t show who has viewed your Reels as it does with Instagram stories. However, you can see the number of people who have viewed your Reels.
Where to see that?
You can see the number of people who have viewed your Instagram Reels either from the Insights section (more on this later) of Instagram or from the profile grid in the Reels Section.
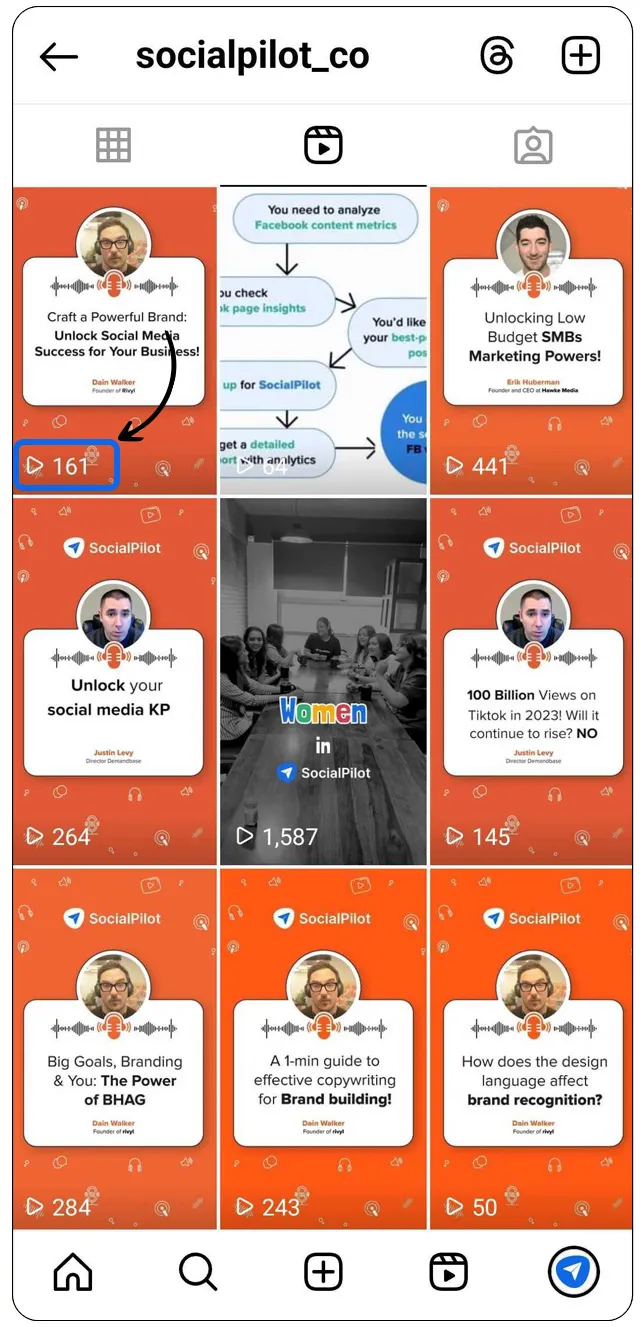
Nonetheless, you can see the number and the identity of the people who have liked your Instagram Reels.
How to Hide Likes on Instagram Reels?
Speaking of likes on Instagram Reels, they can be a double-edged sword.
While they indicate engagement, they may inadvertently shift your audience’s focus away from the quality of your content and onto the number of likes it has received.
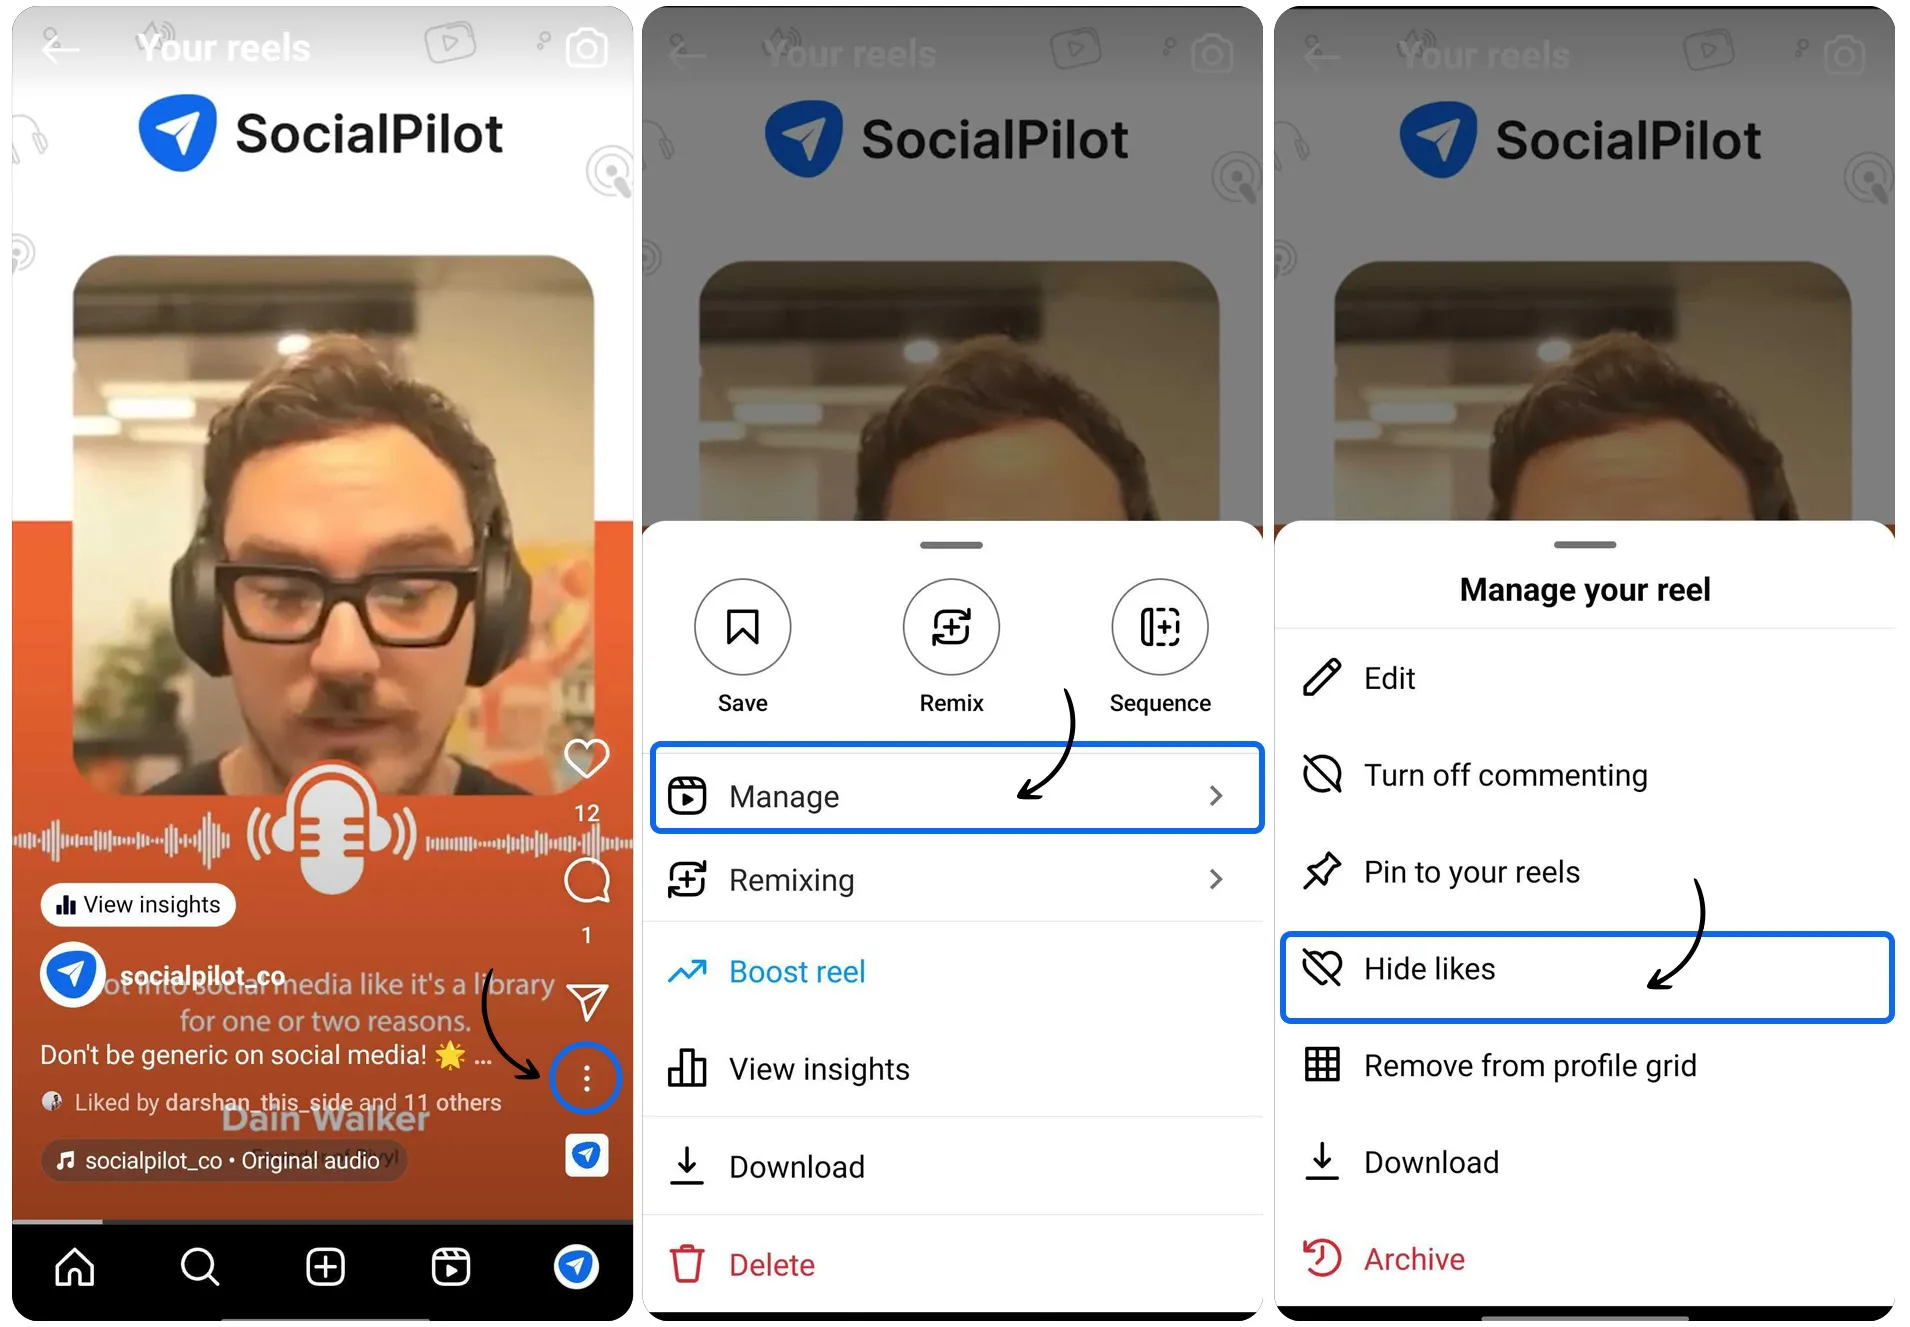
Luckily, there is a way to hide like on your Instagram Reel and, similarly, on every Instagram Post. When you hide the likes, the numerical number gets replaced by merely one username, followed by the phrase “and others.”
So, how can you hide likes on your Instagram Reel?
Open your Reels and tap the three dots in the bottom right corner. Click on the “Manage” option, and you will get the option to hide the likes there.
Unlocking the Instagram Reels Size, Dimensions, and Specs
Reels are a great feature on Instagram to give you the reach your business deserves. So, you don’t want to miss the opportunity. After all, you’re putting your heart and soul into crafting those ultra-creative videos, following every trend, performing every dance challenge – all that jazz.
But picture this:
You’ve made a cracking video; it’s got the charm, the wit, the style. Then you publish, and oh no – your epic content gets squished, chopped, or worse, stretched into oblivion.
Why?
Because it wasn’t made with the right dimensions in mind. It’s one common mistake that businesses make while posing Reels.
Let’s help you avoid this mishap.
We are here to spill the beans on the exact Instagram Reel sizes and dimensions to ensure every Reel you publish is nothing short of picture-perfect.
- Aspect ratio (Full-screen mode): 9:16
- Aspect ratio in (Instagram feed): 4:5
- Dimensions: 1080 pixels x 1920 pixels.
- Instagram Reels Duration: Upto 90 seconds Max
- Instagram Reel cover size: 1080 pixels x 1920 pixels
- Instagram Reel thumbnail size: 1080 pixels x 1080 pixels

What is the Best Time to Post Reels on Instagram?
Here’s the million-dollar question: when is the best time to post Reels on Instagram?
After all, posting at the right time ensure maximum engagement – which is what any creator is looking for for their Reel.
This “optimal time” varies from account to account – depending heavily on your specific audience demographic and their respective time zones.
However, here’s a general guide to navigating the tricky waters of Instagram Reels timing:
| Day | Best Time to Post Reels on Instagram |
| Monday | 3 am, 7 pm |
| Tuesday | 12 am, 1 am, 6am |
| Wednesday | 4 am, 6 am, 9 pm |
| Thursday | 6 am and 4 pm |
| Friday | 2 am, 11 am, 1 pm |
| Saturday | 9 am, 4 pm, 5 pm |
| Sunday | 5 am, 8 am, 1 pm |
How to Access and Use Instagram Reel Analytics?
Accessing and utilizing Instagram analytics is crucial for fine-tuning your content strategy and maximizing engagement. By analyzing the performance of your Reels, you can gain valuable insights into what resonates with your audience, helping you create more impactful content.
Here are three methods to access Instagram Reels analytics:
- Single Reel Insights
- Instagram Insights Tab
- SocialPIlot’s Instagram Analytics Tool
Now, let’s break down each of these methods step by step and turn you into an Instagram Reels analytics pro:
1. Single Reel Insights
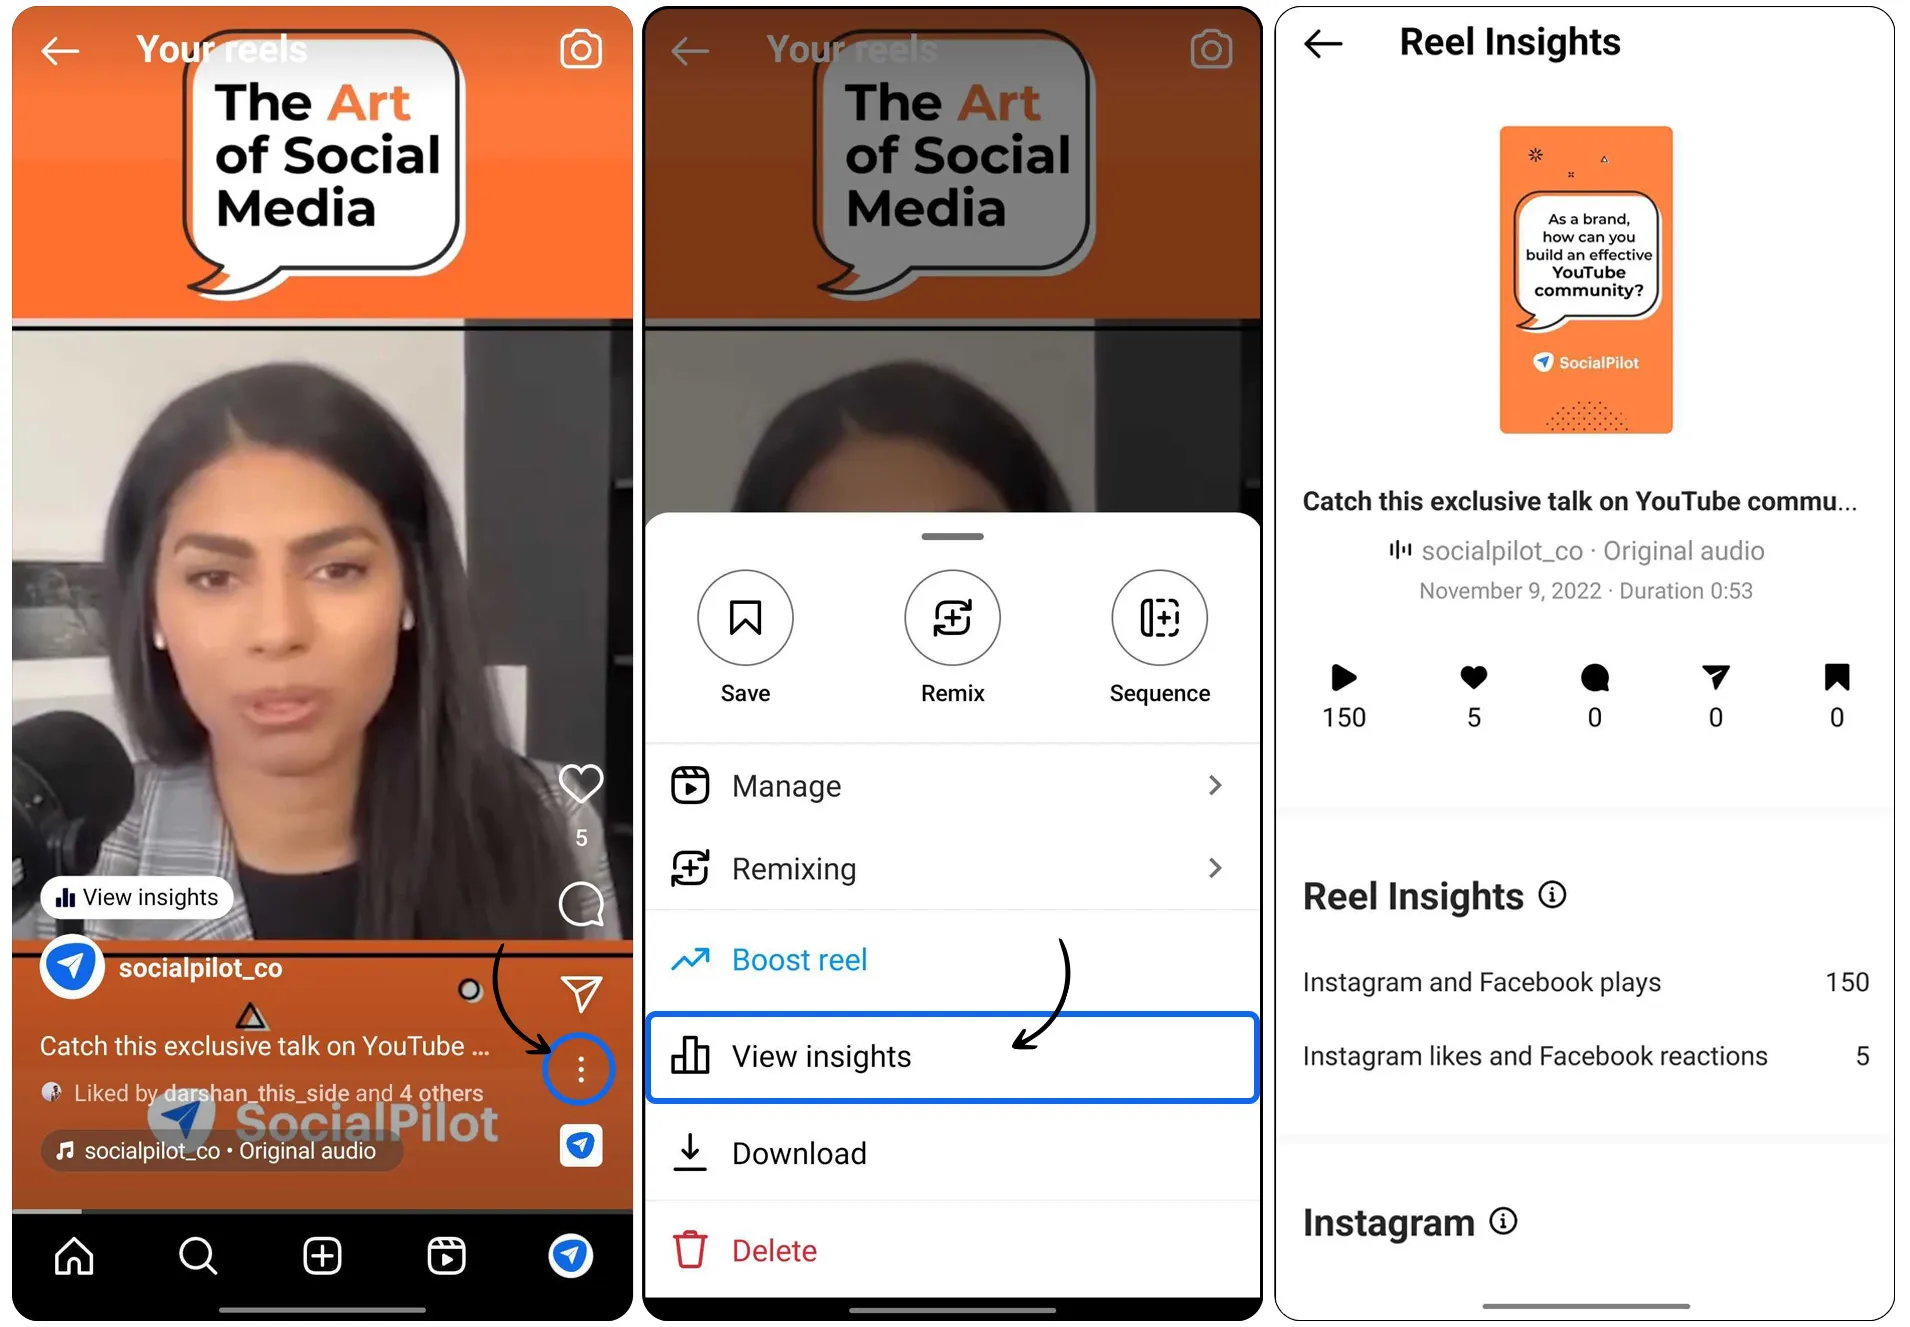
You may want to see how every Reel of yours performs and identify what unique elements made it successful. Here’s how you can do it in three easy steps:
Step 1: Kickstart by heading over to your profile page. Find the Reel you want to dive deep into.
Step 2: You will see a three-dot icon at the bottom right corner of your screen.
Step 3: Tap on that icon, and a menu will appear. In the list of options, hit ‘Insights.’ Voila! You can now see how your chosen Reel is performing.
2. Instagram Insights Tab
Next, let’s take a deep dive into what you want to take a deep dive into Reels Analytics. This section best checks the performance of all your Reels against one another based on different metrics.
Step 1: Open your Instagram profile. Once you’re on your profile, click on the three-lined icon at the top right corner to open the menu.
Step 2: Inside the menu, tap on ‘Insights.’ This will open a new page containing various account activity statistics.
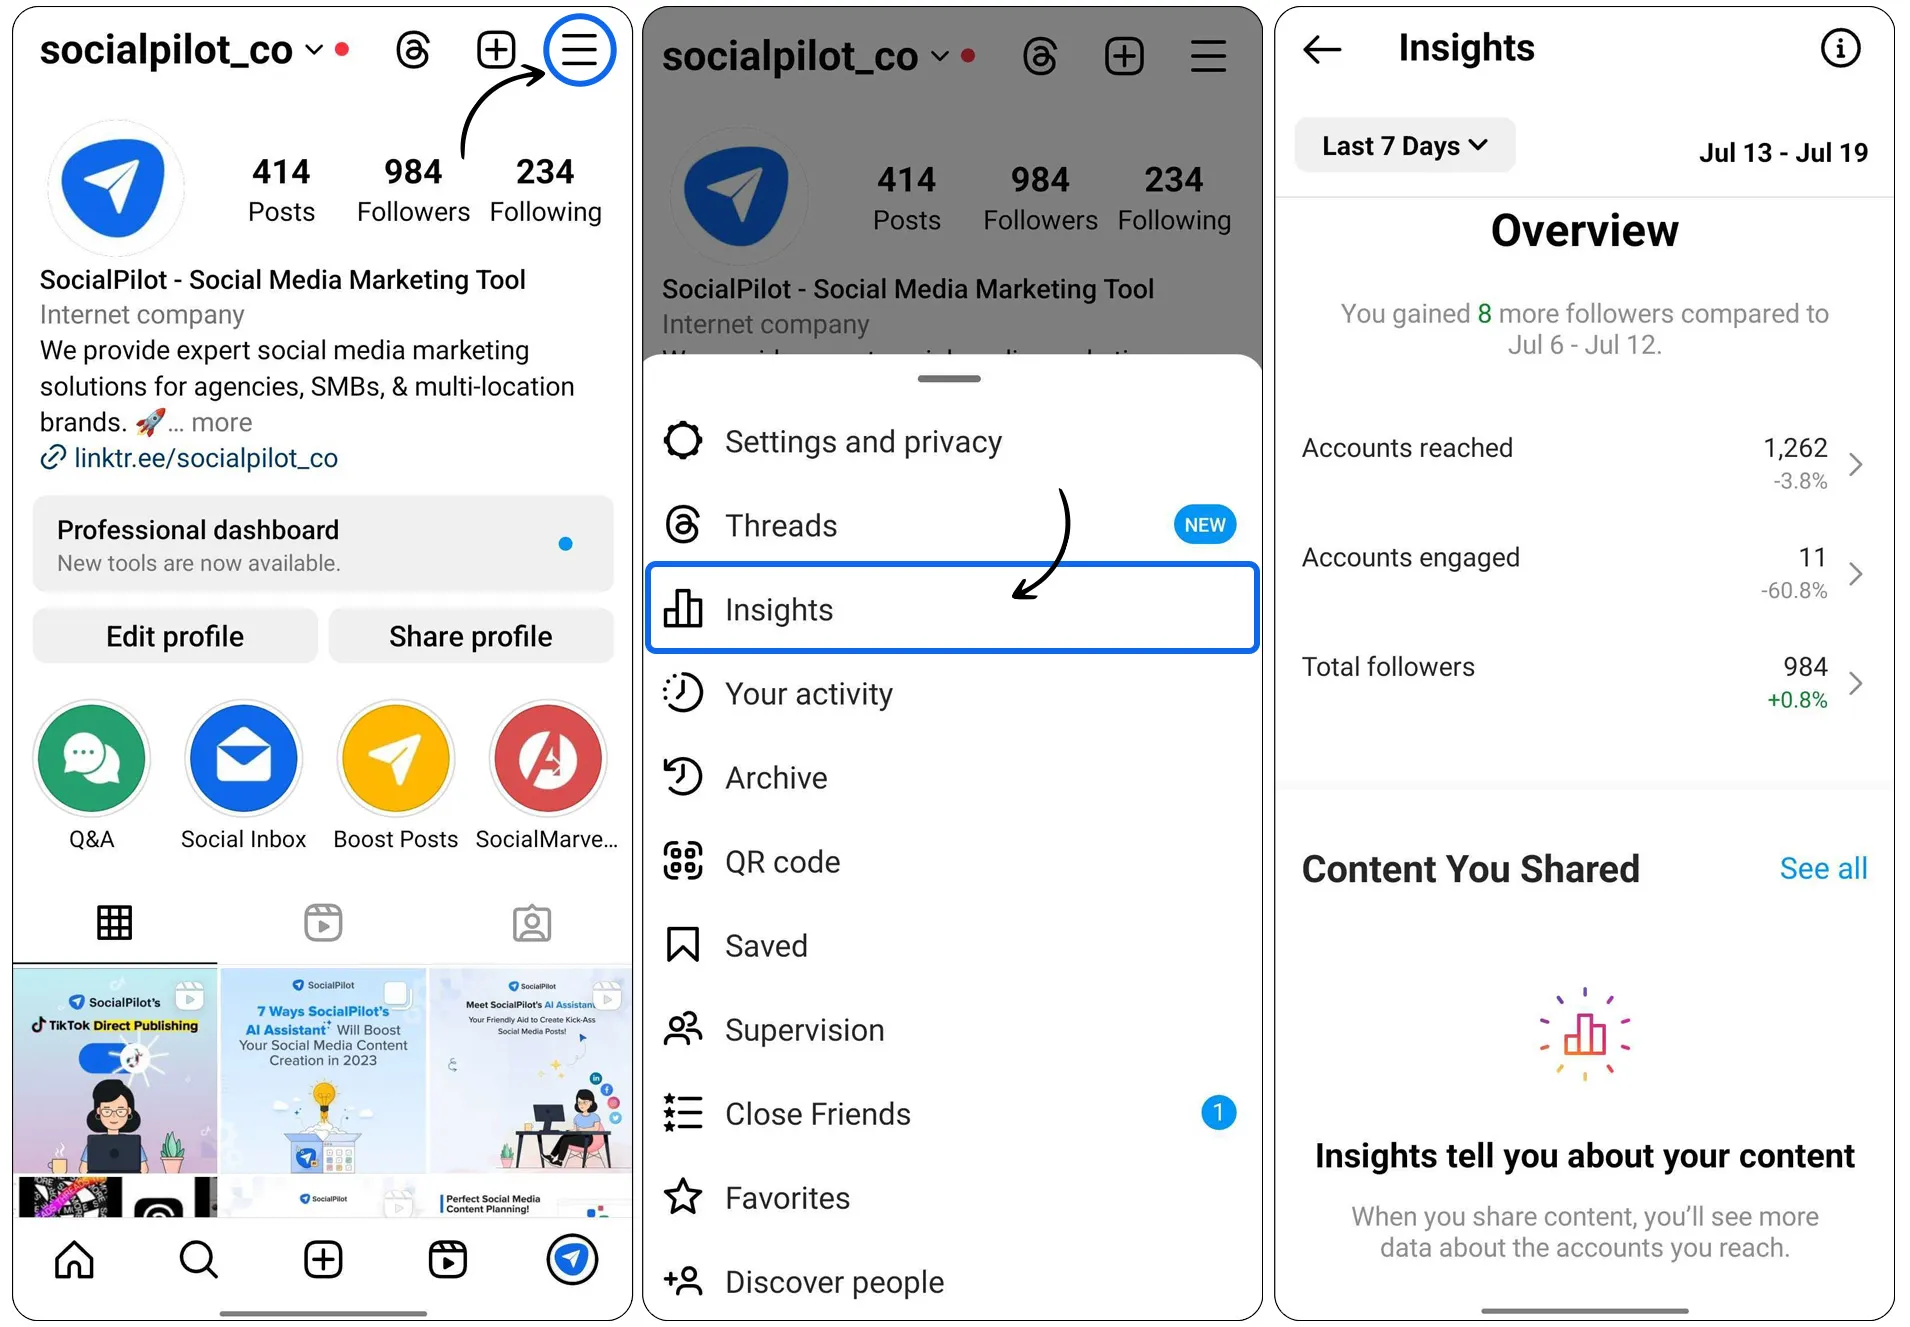
Step 3: Navigate through this page to find the section dedicated to your Reels performance. This section allows you to compare how your Reels videos perform against one another.
Step 4: The Reels insights can be sorted by different metrics, including comments, likes, saves, reach, plays, shares, and overall Reel interactions. Choose the one you want to analyze further. This way, you get a comprehensive view of your Reels performance.
3. SocialPIlot’s Instagram Analytics Tool
While Instagram’s native analytics is a handy tool for analyzing your Reels performance, it falls short when managing multiple accounts.
The challenge?
Sifting through each account’s analytics on the native platform is time-consuming and tedious.
That’s where a comprehensive social media management tool like SocialPilot steps in. Packed with robust Instagram analytics features, among other functionalities, SocialPilot stands out for its ability to offer insights across multiple Instagram accounts and other major social media platforms within a single dashboard.
This unified overview simplifies social media marketers’ analytical process, enabling them to manage and monitor performance seamlessly. Now, let’s dive a little deeper into the Instagram Reels analytics offered by SocialPilot.
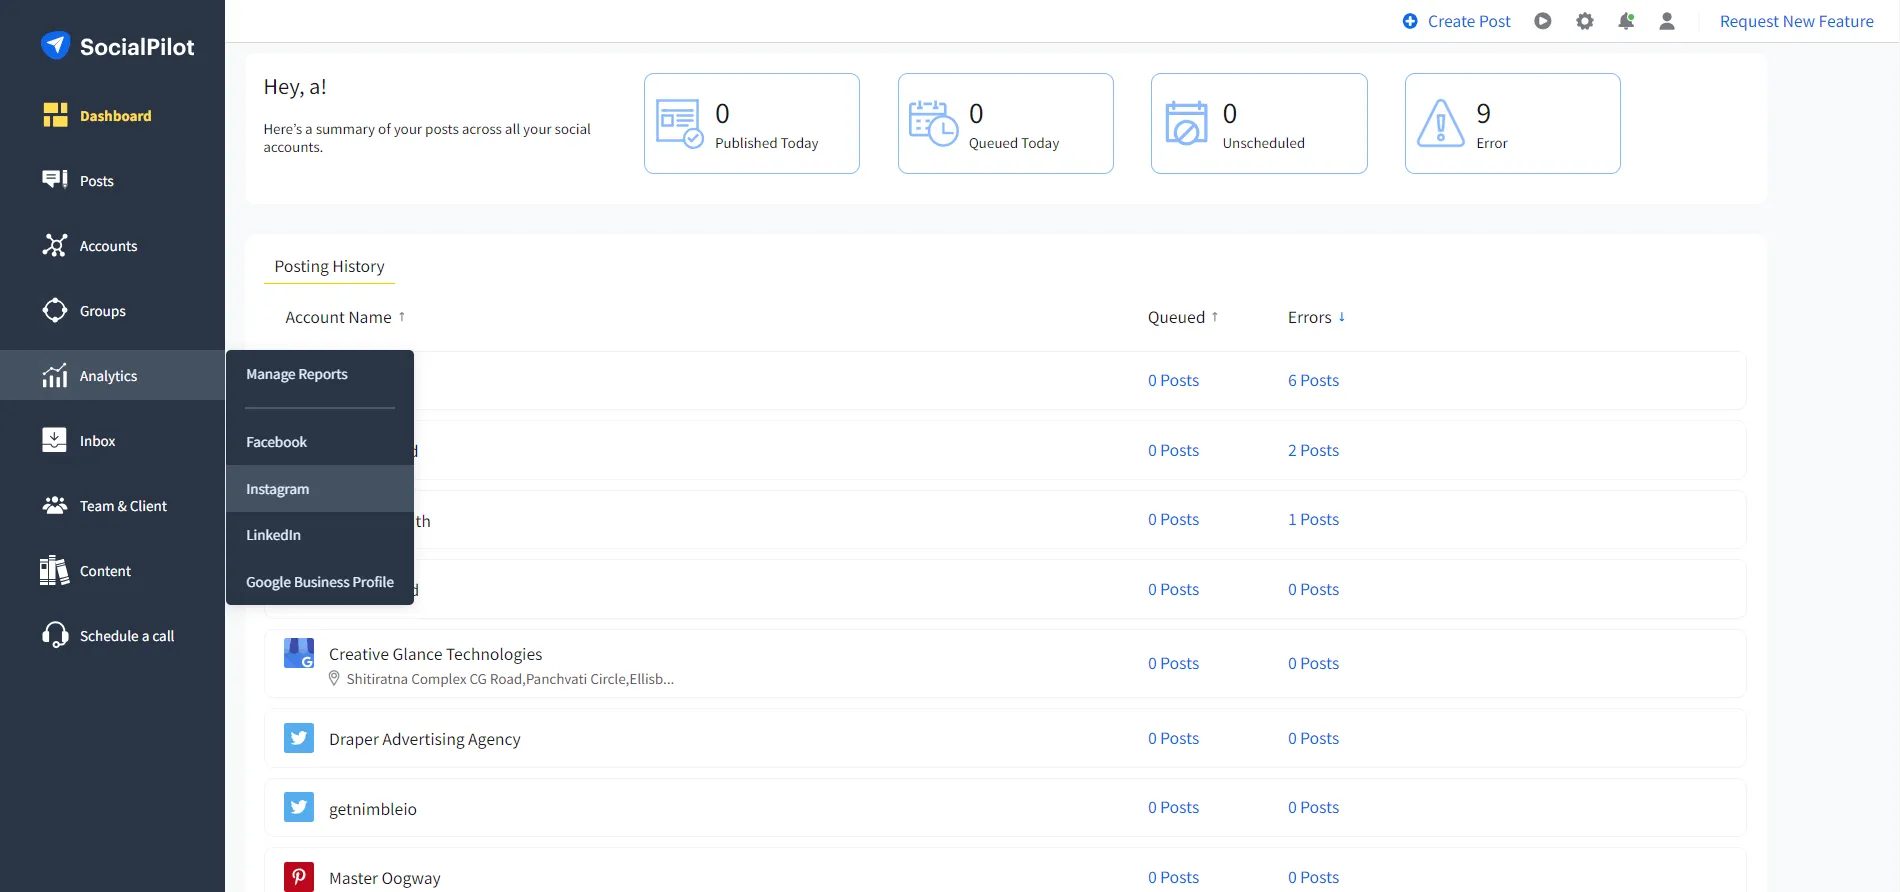
Step 1: Log into SocialPilot from your desktop to access your Instagram analytics. Once logged in, move to the left-side menu and select the ‘Analytics’ option. This will present you with a list of various social media platforms. Simply choose ‘Instagram’ from the list.
Step 2: Choose the account you want to assess, and at the top bar, you will see the option to switch to the analytics of your Profile, Posts, Stories, and Reels analytics. You need to move to the ‘Reels section.’
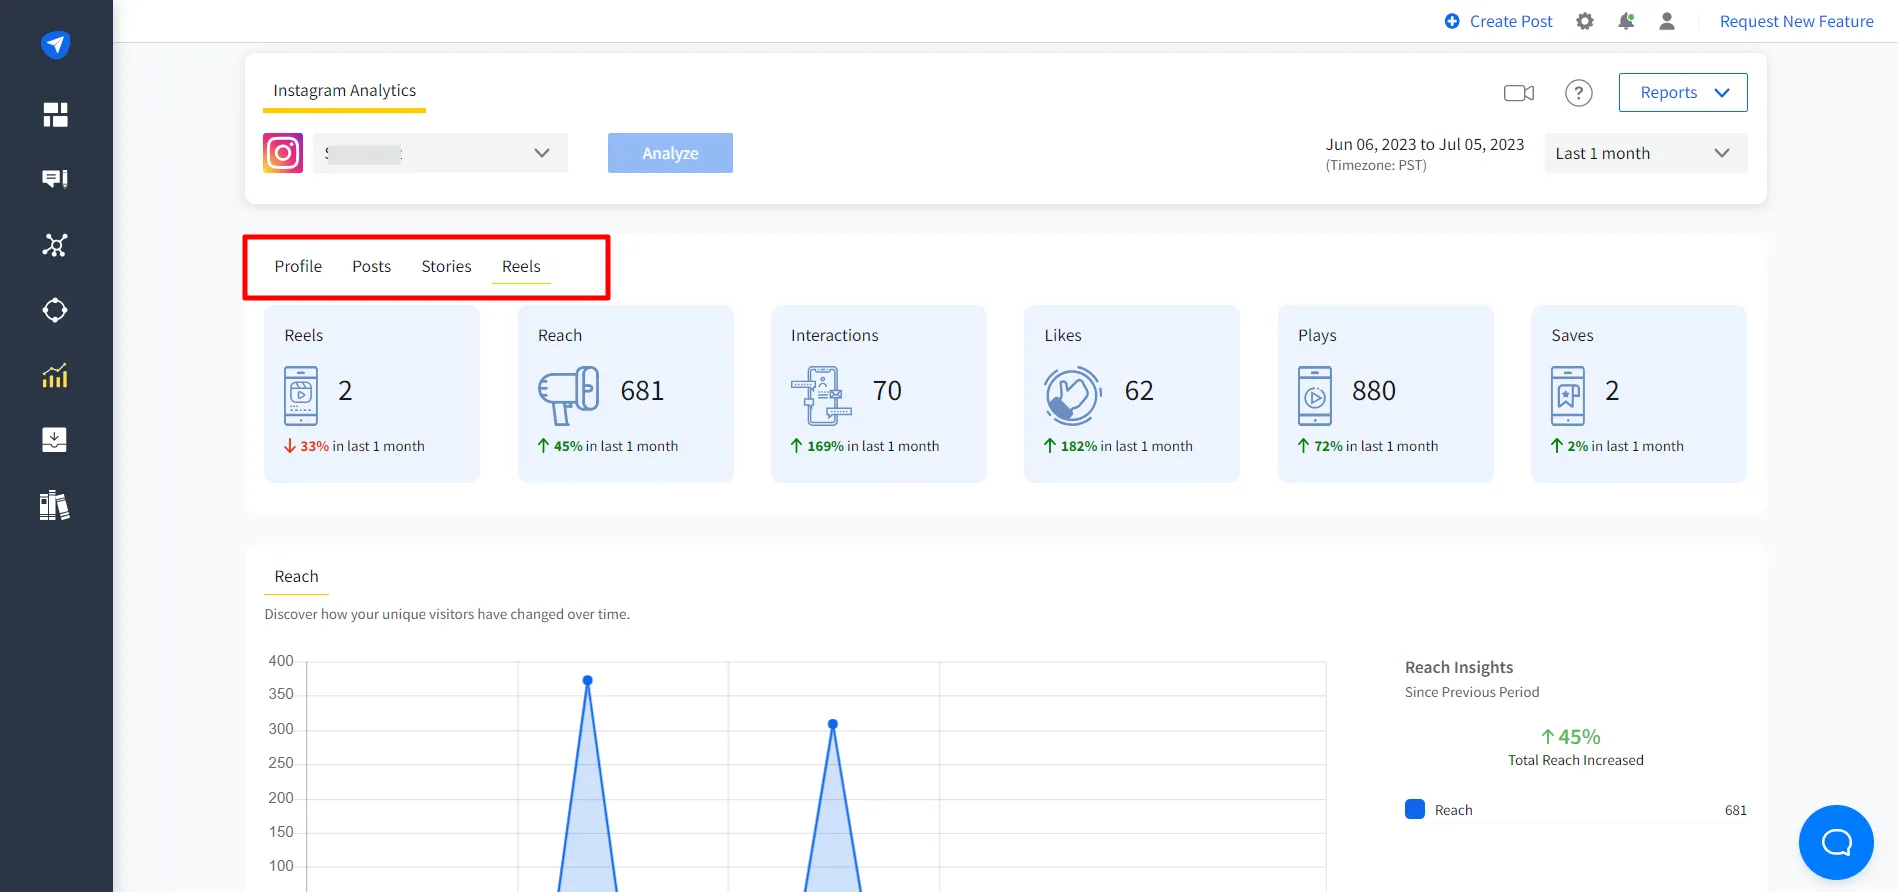
Step 3: SocialPilot provides a wealth of insights for your Reels. You can analyze various aspects of your Reels’ performance, such as engagement metrics, audience interactions, and more. SocialPilot also offers features like identifying the most active fans, determining the best times to post, and combining analytics reports.
4 Tips to Effectively Use Your Instagram Reels Analytics
Now that you know where to find your analytics, let’s understand what you need to do with them to strengthen your Instagram Reels strategy.
1. Identifying Top Performing Reels
To refine your Instagram Reels strategy, it’s crucial to identify which Reels resonate most with your audience.
Dive into the specifics:
What content type, hashtags, Reel length, audio choice, and posting time contributed to their success? This analysis helps you understand what captivates your audience and drives engagement.
2. Gauging Reach and Impressions
Analyzing the reach and impressions of your Reels offers insights into the extent of your content’s spread and the size of your potential audience. A high number of impressions with lower engagement might signal the need to adjust your content to better captivate your audience’s interest.
3. Measuring the Impact of Hashtags
Hashtags are crucial in extending your content’s reach on Instagram. By evaluating the performance of Reels with specific hashtags, you can identify which ones amplify your visibility and engagement. Instagram hashtag analytics enables you to fine-tune your hashtag strategy for more effective audience targeting.
4. Monitoring Growth Over Time
Tracking your Reels’ performance over time is essential for understanding your growth trajectory. An upward trend in views and engagement rates indicates the success of your current strategy, while a decline suggests the need for strategic adjustments or a renewed focus on audience engagement.
Regular monitoring allows you to celebrate successes and pinpoint areas for improvement.
How Do You Get Paid for Reels on Instagram?
The minute we hear Instagram monetization – the Reels Play bonus program comes to our mind. Oh, the glorious idea of rewarding creators when they hit certain goals for views on their Instagram Reels.
Sadly, Instagram has discontinued its Reels bonus program.
Meta has stopped extending new and renewed Reels Play deals on Instagram in the US and India. However, they will continue to cater to the existing Instagram Reels Play deals until they expire.
So, what next for creators willing to crunch out some moolah from their Instagram Reels?
Well, there are still a few methods to monetize your Instagram creativity, such as:
- Brand collaboration: You can collaborate with brands for sponsored content. Businesses always seek creators who can help them reach a wider audience. If you have a substantial follower base, brands might approach you, or you can pitch them your ideas. Remember to maintain authenticity and only endorse products that resonate with your brand and audience.
- Affiliate Marketing: Affiliate marketing is another way to earn money through Reels. You can promote products or services in your Reels, and every time a sale is made through your referral link, you earn a commission. To succeed in affiliate marketing, you should ideally promote products that you genuinely like and relevant to your followers.
5 Tips for Businesses to Master Instagram Reels
Reels are a great value driver for your business’s marketing goals only if you know the tips to use them to their fullest potential.
What are these tips?
Here are five amazing tips that will help you harness the power of Instagram Reels.
1. Hop on Instagram Reels Trends
To harness the power of Instagram Reels, you must let your brand bask in the limelight of what’s currently trending on Instagram.
This involves staying on top of the latest trends and incorporating trending audio tracks, creative effects, or even participating in viral challenges related to your brand or industry.
You must be thinking if that is a bit ‘extra’ for a brand, right?
Well, it’s perfectly fine as long as your usage of trends complements your core message and brand image. As a matter of fact, an ideal blend of trends and originality can transform your Reel into an engaging, shareable piece.
2. Create Educational Reels With Captions
Don’t shy away from sharing educational Instagram Reels. People love to watch value-driven content like tips, how-to guides, or ‘behind-the-scenes’ insights. This boosts your brand authority and improves engagement, as users often save and share informative Reels.
However, remember one critical aspect:
Incorporating on-screen text and subtitles for improved clarity and accessibility. A large chunk of users browse Instagram with their sounds off. If your Reel merely features a talking head with no subtitles, they’ll likely scroll past without a second glance. With captions, you hold the power to captivate even silent scrollers.
3. Collaborate With Influencers and Creators
Influencers and creators are Instagram’s biggest currency. Their credibility, authenticity, and relatability make them magnets for followers and engagement. Good for businesses, Instagram has a feature called “Collabs” that lets them easily collaborate with creators on Instagram Reels.
Look how Wellness Pet Food, a pet food company, has collaborated with a rather interesting influencer – Luna, the trick dog.

How to use the Collabs feature?
Firstly, choose influencers whose values align with yours and who have a following that fits your target demographic. This increases the chance of their followers converting into your customers.
After choosing the influencer, let them do what they do best – create engaging content. Influencers have mastered the art of creating content that resonates with their audience.
Finally, when your Reel is ready, opt for ‘Tag people’ and select ‘Invite collaborators.’ Here, you tag your chosen influencer. This way, when the Reel is published, it appears both on your profile and that of the influencer, driving engagement from both your audiences – a classic win-win scenario.
4. Categorize Your Reels With Hashtags and Topics
Categorizing your Reels smartly is the key to getting to the right audience. It tells the algorithm about your Reel’s content and helps it showcase your Reel to the relevant audiences.
So, how do you categorize your Reels?
The hashtags are the not-so-secret sauce of categorization and discovery on Instagram. When used strategically, hashtags can boost visibility and attract the right eyes to your Reels. So, be sure to use a mix of popular hashtags and industry-specific tags that align with your content. This way, you’ll strike the perfect balance and maximize your reach.
But that’s not all.
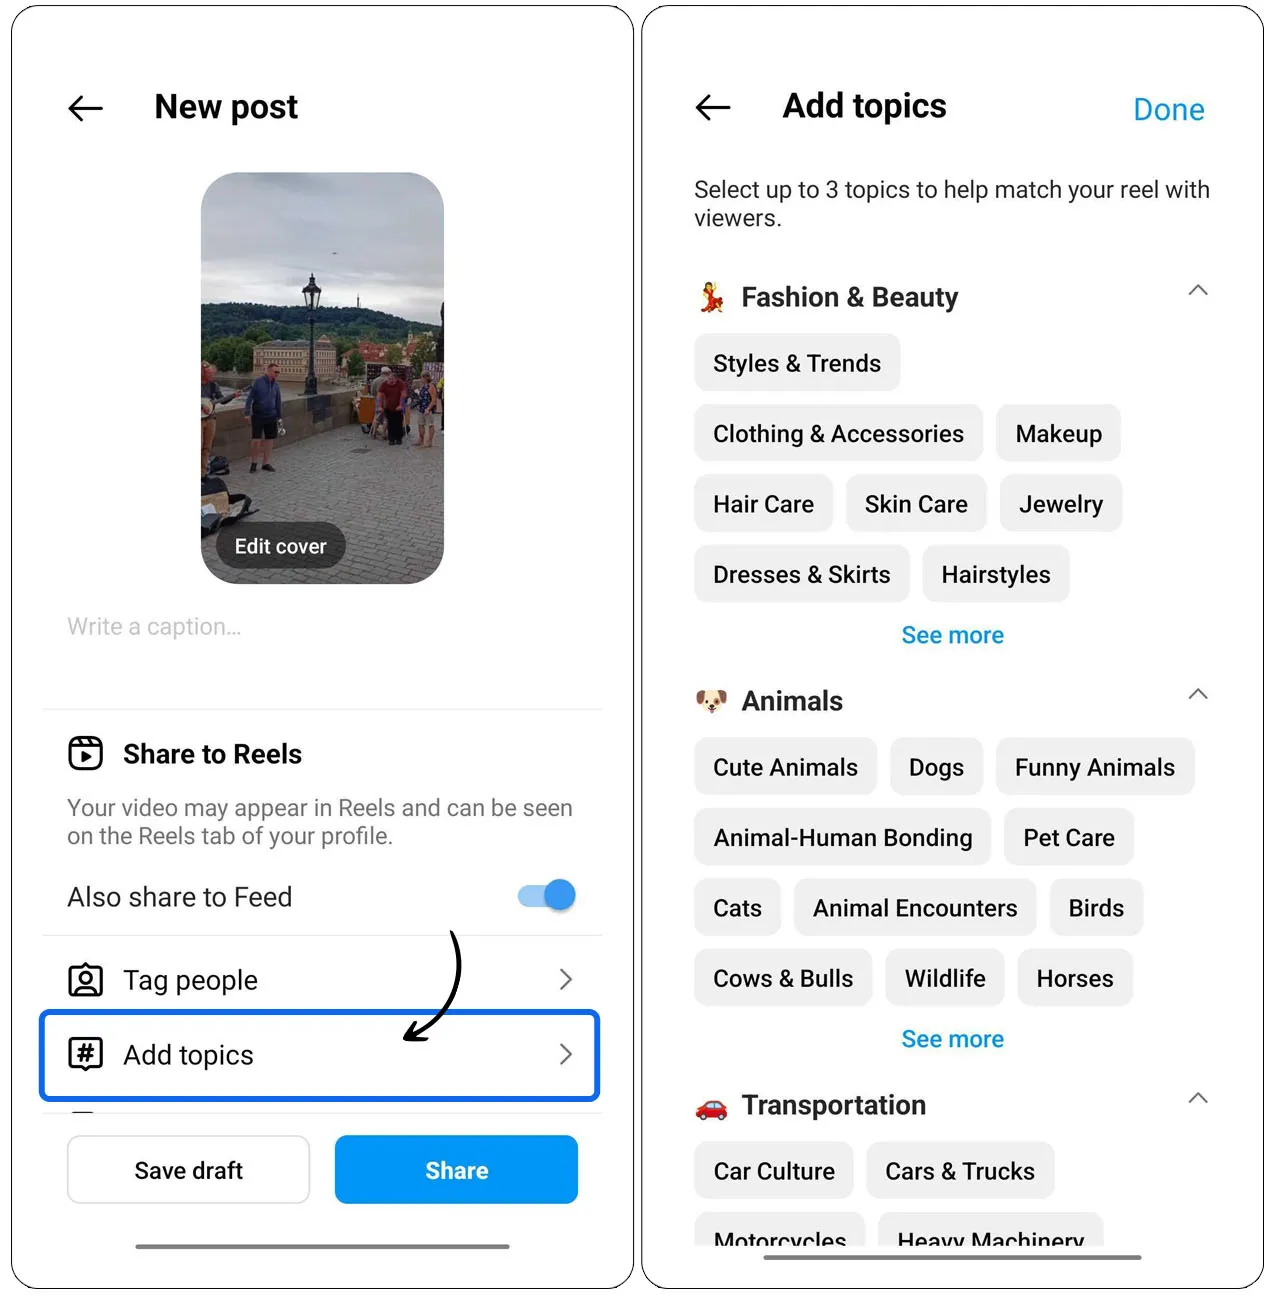
Instagram has a hidden tool called ‘Topics.’ This feature allows you to add industry-specific tags to your Reels, helping you categorize them more effectively.
Here’s how to add Topics to Your Reels Content:
- Create and upload your Reel, as usual.
- Before hitting that publish button, scroll to the bottom and tap “Add a Topic.“
- You get to include up to three Topics for your Reel. Choose wisely! Select topics that are relevant to your industry and vary from one another. This way, you’ll expand your reach and connect with diverse audiences.
Remember, the algorithm loves organized content. Help it out, and it’ll reward you with a larger audience.
5. Engage With Your Audience Through Reels
Finally, don’t treat your Instagram Reels as just a broadcasting platform for your brand. The crux of Instagram – and every social channel, for that matter – lies in communication. So, consider Instagram Reels as an interactive medium that allows you to connect and engage with your audience directly.
How to kickstart the conversation?
There are multiple ways to encourage engagement through Instagram Reels, which include:
- Question and Answer Reels: Ask intriguing questions about your industry, product, or even a hot topic. The goal is to trigger responses and foster a conversation in the comments section.
- Opinion-based Reels: Stir the pot a little and ask for opinions inside the comment section. It could be about your new product launch, the latest industry trends, or any topic that resonates with your audience.
- Contest and Giveaway Reels: Everyone loves winning. Hosting contests or giveaways through your Reels is an effective way to boost engagement and increase your reach. Plus, it adds an element of fun to your content.
- Shareable Reels: Create content that users would love to share. It could be an insightful tip, a compelling story, a funny moment, or even a challenge. The more your Reels are shared, the wider your reach.
The more your audience engages with your Reels, the more likely Instagram will push your content to more people. Engaging with your audience boosts your content’s reach and fosters a stronger community around your brand.
Ready to Reel In Instagram Growth?
Alright, you’ve made it to the end of our comprehensive Instagram Reels guide.
By now, you have understood that Reels isn’t just another feature of Instagram – it’s a goldmine of opportunities for businesses and creators alike. That’s why we tried to give you the complete rundown of the feature so you can fully harness its power to grow your business.
We’ve covered every facet – from the nuts and bolts of Instagram Reels and its algorithm intricacies to the strategies for creating and boosting engaging Reels. We also walked you through the monetization labyrinth and gave valuable tips to fine-tune your business strategy.
So, as you take this knowledge and venture into the vibrant world of Instagram Reels, keep sight of what matters most: your unique story and the people who are there to listen.
Also, don’t forget to use SocialPIlot‘s amazing Instagram features, including Instagram Reel scheduling and analytics, to save time and sanity.
Here’s to your Instagram growth, one Reel at a time. Happy Reeling!


