Do you use Facebook Ads for your business?
Or are you planning to start using Facebook Ads to achieve your business goals?
Whatever be the case, if you want to make the most of Facebook Ads for your marketing campaigns, you cannot skip using Facebook Pixel.
Being used by over 4 million websites globally, it is one of the key elements of any Facebook paid marketing campaign.
You might think, how can this Pixel be so popular?
Well, it is an ingredient that can increase the effectiveness of your campaign, provide you with in-depth analytics, and prove to be a gold mine for your business.
If you want to track, refine, test, and target your Facebook ads with laser focus then Facebook Pixel is a must-use for you.
Let’s explore it a bit more in this guide.
What is Facebook Pixel?
Facebook Pixel is a small JavaScript code when added to a brand’s website, is capable of tracking user actions on-site and sending data back to Facebook for further processing.
With this data saved inside Facebook, you can optimize your ad campaigns for better targeting, remarketing to visitors who visited your website but didn’t take a specific action, and even create a lookalike audience to improve your current reach and future ads.
All the recorded Pixel activity can be seen under Events Manager inside Facebook Business Manager.
Basically, a Facebook tracking Pixel is a small img with a dimension of 1*1px, hence the name Pixel. While setting it up, Facebook asks to add the code in the website header to load as soon as somebody visits a website.
It is designed to camouflage or be transparent in the website background so that it remains unnoticed.
But Facebook Pixel was not the same when it was initially launched. Let’s dive into the history of Facebook Pixel.
History of Facebook Pixel
When Facebook introduced Pixel to the world, they launched two kinds of Pixels with different tasks:
- Facebook Retargeting Pixel
- Facebook Conversion Pixel
Facebook retargeting Pixel was used to help the user target its audience who already visited the website. It enabled businesses to create a separate retargeting campaign and reach out to the audience that visited their website once.
The Facebook conversion Pixel was used to track sales conversions. It helped to check the number of conversions a business received with the help of Facebook Ads.
Facebook only allowed one retargeting Pixel per account and multiple conversion Pixels to track conversions on various platforms.
Until 2015, Facebook decided to merge both the Pixels and create an improved and new version known as Facebook Pixel.
With the advancements in technology, in 2017, Facebook added multiple tracking features like page metadata and button click activity to enhance the effectiveness of Facebook Pixel.
And even now, Facebook is consistently improving its Pixel and making it as effective as possible.
But there’s much more for your business than just tracking the visitors and improving your marketing efforts.
Let’s understand a few critical insights about Facebook Pixels that’ll help you extract the best out of it for your business.
3 Insights About Facebook Pixel that can Transform Your Marketing Game
If you are not using Facebook Pixel for your paid advertising efforts on Facebook, you are shooting in the dark.
With the importance of real-time data skyrocketing for businesses, you must have a bridge between your website and Facebook using Facebook Pixel.
It will help to improve the performance of your Facebook Ads and will solidify your retargeting efforts. Here are three insights about Pixels that are important for you:
1. Target Audience Creation
Facebook Pixel is vital for you to use dynamic ads and create effective retargeting marketing campaigns.
You could get back your potential customers to take a specific action if they skipped acting in the previous visit to your website.
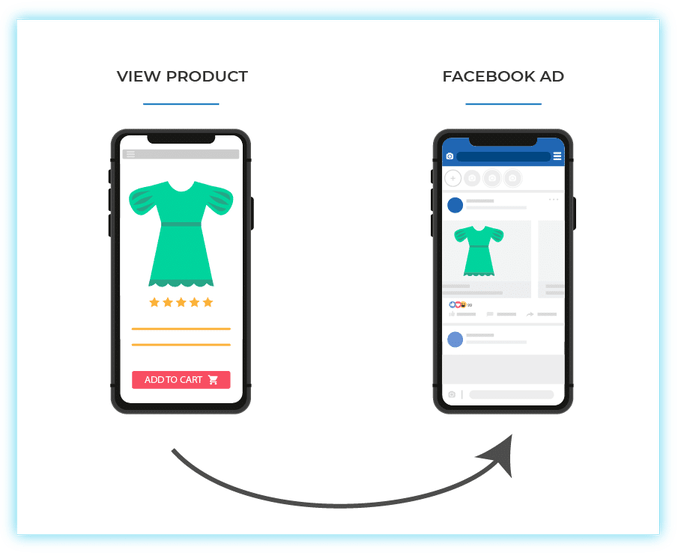
For example, if a visitor visited your online store and chose to purchase a product but somehow didn’t complete the purchase, the product is left abandoned in the cart. With the help of Facebook Pixel, you can now check if a conversion event didn’t happen and then create a dynamic Facebook Ad showing the same product to the customer in their Facebook feed.

You also can find a new audience using the Facebook Pixel by using the options custom audience and lookalike audience.
You can create a custom audience, keeping in mind the buyer persona of your target audience and select multiple characteristics for micro-targeting.
The options you’ll get with Facebook will be highly beneficial for spotting your exact audience and improving the reach of your ad campaign.
Facebook also helps to create an audience set having similar characteristics to all your visitors on your website.
You can select the lookalike audience feature to let Facebook create a lookalike audience for your already existing audience set.
It is one of the standout features that Facebook provides its users. Another add-on that Pixel provides is updating the audience list automatically, which keeps it relevant for all the following cold traffic campaigns.
2. Measuring
If you want to measure the impact of your ad campaigns and how people are reacting to your ads, you can use Facebook Pixel for better understanding and measuring your ads performance.
You’ll get detailed information about how people interacted with your website after viewing your ad on the social media platform.
The Pixel tracks the audience interaction on different devices as well. For example, if a prospect saw your ad on a mobile device and purchased a product on a desktop, you’ll get all the information.
You need to set the URL parameters right when you kick-start your ad campaign if you want to track your ad campaigns correctly.
Facebook Pixel will enable you to track your customer’s behavior at every stage of your sales funnel. From awareness to retention, you’ll get a complete picture related to your customers’ engagement activities.
It will help you make well-informed decisions to optimize your ad campaigns and improve your ROI from paid Facebook campaigns.
You can scroll through different vital metrics that Facebook Pixel provides, such as CPP (Cost Per Purchase) and ROAS (Return on Ad Spend).
It is a great measuring tool for all your paid campaigns’ performance.
3. Optimization
Facebook has every detail about its audience, enabling the marketers to target and place their ad campaigns to be more likely to take a specific action.
If you have enabled Facebook Pixel, it will collect data of your target audience and help Facebook to optimize the campaign tailored to your target audience.
You need to set up your campaign objective as ‘Conversions’, and Facebook will optimize your ad campaign for different conversions like sign-up or purchases.
If you want to show your ad to people who are more likely to complete high-value purchases, you can optimize your campaign for value.
So, this is how Facebook Pixel can help skyrocket your conversions and maximize the ROI of your ad campaigns.
Now that you know what Pixel is and what all you can use it for, let’s understand how to start using it.
How to Create Facebook Pixel?
Before you start creating and setting up the Pixel, two things are a must-have for you:
- A business website
- Backend access to it for adding the Pixel to the site
Got the website ready and have the backend access?
Perfect. Proceed as per the steps below.
Step 1
Open Facebook Events Manager on your desktop and log in with your Facebook account.
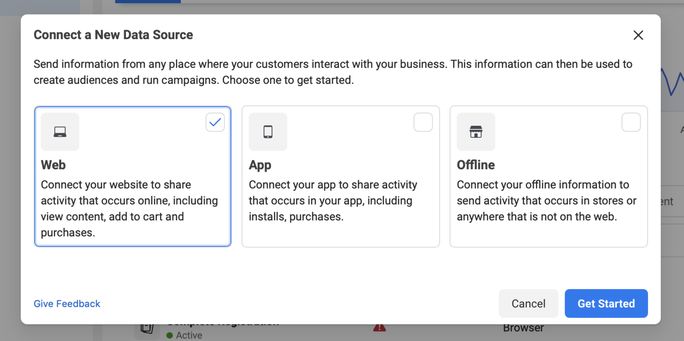
Then you need to select Connect Data Sources on the left menu section.
Step 2
You need to select the web option and then click Get Started.
You’ll get two options: Conversion API and Facebook Pixel, select the second option and click Connect.

Step 3
You need to name your Pixel and add your website link in the detail section. Once you are done, select Continue.
Step 4
Congratulations, your Pixel is ready. Easy, right?
Once you have the code, now you need to install it on your website.
Let’s see how that’s done. It’s even easier; you don’t need to be tech-savvy, we promise.
How to Install Facebook Pixel?
There are two ways to install a Pixel on your website. Either manually or by using a partner integration.
First, you need to go to the Facebook Events Manager, select your Pixel, and click Continue Pixel Setup.
![]()
Manually
Step 1
You need to copy the Pixel base code and locate your website’s header on your web platform or CMS.
Once you find that, paste the code below the header section above the closing head tag i.e. </head>.
Step 2
Select Continue, and you are good to go.
Partner Integration
Step 1
In the Event Manager, select the Partner Integration option.
Step 2
You need to select a relevant partner and then follow the instructions displayed on the screen.
You have multiple options provided by Facebook like:
For eCommerce
- Magento
- Shopify
- Woocommerce
For Website Platforms
- Wiz
- WordPress
- Squarespace
Step 3
Once done, your Pixel will be ready to use. You also have the option to tweak the Pixel settings to extract better results.
Conclusion
Facebook Pixel is one of the most compact and powerful tools that carry the power to explode your Facebook marketing efforts. Now you know all the insights and the steps to install and make the most of your Facebook Pixel.
If you want to stand out from your competitors with top-notch paid marketing campaigns, you need Facebook Pixel installed on your website.
Also, if you need any assistance with your overall social media marketing efforts, you can get your hands on SocialPilot, one of the leading social media management and optimization tools that can boost your marketing efforts.


